Types of Text
a) 3D Type - http://tutorialoutpost.com/author/Denny+Tang
- Create a new document (8 inches wide and 6 inches high with a resolution of 300 with a background color of white)
- Select you horizontal Text
 tool and select a large Font size (150 points Black). If you wish to use a different color, click on the foreground color of the color selection
  button and choose a color range from the vertical meu and then click inside the color flat for a more exact color and then press ok.
- Type your first name and then from the Layer menu select "Rasterize - Type". You will note that a new layer has been created in the Layers Pallete and it will be identified with a light blue color.
- From the Edit menu select "Transform - Perspective".
- Grab the left Anchor point and pull to the left. Repeat with the other corner Anchor points to achieve the perspective you want.
- Double click inside the box to apply the effect.
- From the Filter menu select Stylize - Emboss and apply settings such as Angle 145, Height 3 and Amount 151. Press ok.
- To create a degree of thickness to your text hold down the ALT and Command keys and press the up arrow key a number of times. The more times you press the up arrow key the thicker your text will be. You will note that each time the up arrow key is pressed another layer is created in the Layers Pallete.
- Go to the Layers Pallete and click on the eye next to your background layer to hide it.
- The next step is to merge all the visible layers in the Layers Pallete. The layers will be merged so that we can apply some layer styles to our text. To merge the layers click on the little arrow button on the top right hand corner of the Layers Pallete and select Merge Visible. The result is two layers - one being the text layer and the other being our background layer.
- To apply layer styles double click on the text layer or click on the small letter "f"
 at the bottom of the Layers Pallete. Remember to click on the name of the style to activate that style's menu.
- Save the text.
b) Making a Metalic/Chrome Effect - http://www.idigitalemotion.com/tutorials/text2.html
- Create a new document (8 inches wide and 6 inches high with a resolution of 300 with a background color of white).
- Using the horizontal text tool type your first name and then from the Layer menu select "Rasterize - Type".
- Double click on the text layer so that layer styles can be applied to our text. Remember to double click on the name of the style to activate that style's menu.
- Settings that can be used for this project:
- Drop Shadow - Blend Mode - Normal, Opacity - 50, Distance, Spread and Size - 6
- Inner Shadow - Opacity - 35, Distance and Choke - 0, Size - 18
- Inner Glow - choose a color for the glow, Size - 3, Range - 75
- Outer Glow - Opacity - 100, choose a color for the glow, Spread and Size - 1, Range - 100
- Bevel and Emboss - Technique - Chisel Hard, Depth - 630, Size - 10, Shading Angle - -60, Altitude - 70, Gloss Contour - ring double, Anti-Aliased checked, Highlite and Shadow Opacity - 70
- Contour - Contour - Cove Deep, Range - 100
- Texture - Scale - 644, Depth - 196
- Satin - Opacity - 50, Angle - 60
- Color Overlay - no changes
- Stroke - Size - 1, Fill Type - Gradient with a Scale - 36
- It is recommended that you redo this tutorial and try various settings to achieve the result that you want.
- Save the text.
c) Colorful Beads Text Effect - http://www.tutorialized.com/tutorial/Colorful-Beads-Text-Effect/15152
- Create a new document (8 inches wide and 6 inches high with a resolution of 300 with a background color of white).
- Select the Ellipse
 tool and draw an ellipse that elongates vertically. To change the color of the ellipse use the Color Window at the top of the Menu bar.
- Double click that layer to open the layer styles and apply the following:
- Bevel and Emboss - Inner Bevel, Depth - 441, Size - 4
- Satin - you can set the color effect
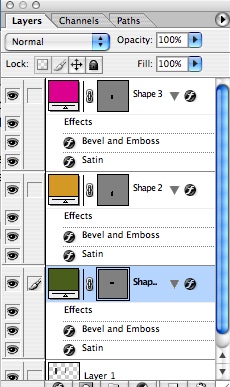
- Each time you draw a new ellipse a new layer is created in the Layers Pallete. To change the layer styles for each new ellipse just double click on the layers style that are linked to that layer.
- When a number of ellipses have been drawn, you will now arrange them to form the first letter of your name. To help with the arranging go to the Edit menu and select Free Transform Path. This will allow you to rotate, flip and scale each ellipse. To apply the transformation double lick inside the bounding box.
- Objects can also be moved using the Move
 tool.
tool.
- Save the text.
d) Outline Effect to the Text - http://www.absolutecross.com/tutorials/photoshop/text/outlines/
- Create a new document (8 inches wide and 6 inches high with a resolution of 300 with a background color of white).
- Type your first name making sure that it remains on its own layer.
- Hold down the Command (CTRL) key and click on the text layer. This procedure will load a selection around the text.
- From the Select Menu click on Modify - Expand and set it to 4 pixels (try varous settings).
- Select the Background layer and then lick on the New Layer icon
 located at the bottom of the Layers Window. This layer will be under your text layer.
- Choose a color you would like to use for your inner outline and press ALT + Delete to fill the selection. Instead of using the key combination you could go to the Edit menu and select Fill.
- Repeat step 5 and for this layer choose Select - Modify - Expand - and set to 2 pixels. Choose another color for the external part of the outline and fill the selection with that color.
- Press Command (CTRL) D to deselect.
- Apply some layers styles to your text.
- Save the text.
Note: the settings that you use are dependent on the resolution of image your are working with. If your image is at 72 pixels per inch pixels settings of one or two are readily visible but if your image is at 300 pixels per inch you may want to use pixel settings of 3 or 6.
e) Light Burst Effect - http://www.tutorialized.com/tutorial/Light-Burst-Text/7542, Author: Nathan NG
- Create a new document (8 inches wide and 6 inches high with a resolution of 300 with a background color of black). To switch background and foreground color just click on the curved arrow on the color selection button.
- Select the type tool and type your name in white. Use a relatively large font size.
- Apply the following layer styles :
- Drop Shadow - Blend Mode - normal, Opacity - 100, Distance - 0, Spread - 39, Size - 6
- Inner Shadow - Blend Mode - normal, Opacity - 100, Distance - 0, Choke - 31, Size - 7
- Color Overlay - Blend Mode - normal, Opacity - 100
- Duplicate the layer by selecting Layers - Duplicate or press the Control (Right Click) key and click on layer and select Duplicate layer.
- Hide the top layer and select the bottom text layer as the active layer.
- Select the Layer Menu - Merge Visible
- Select - Filter - Distort - Polar Coordinates - Polar to Rectangular
- Go to the Image Menu - Rotate Canvas - 90CW
- Select the Filter Menu - Stylize - Wind with settings: Wind direction from the right. Apply the wind filter 2 more times.
- Select the Filter Menu - Stylize - Wind with settings: Wind direction from the left. Apply the wind filter 1 more time.
- Go to the Image Menu - Rotate Canvas - 90CCW
- Select the Filter Menu - Distort - Polar Coordinates Option - Rectangular to Polar
- Select the Elliptical Marque
 tool from the Tools palette to make a selection inside the edge of the white blast.
- Go to the Select Menu - Inverse or Command (CTRL) - Shift - I.
- Go to the Select menu - Feather - 20 pixels.
- Select the Filter Menu - Blur - Radial Blur with settings of Blur method - Zoom, Quality - Best, Amount - 40
- Command - D to deselect
- Go to the Layer Menu - New Adjustment Layer - Color Balance. Press OK. make sure that this layer is above the effects layer. To access the color balance layer controls double click on the first thumbnail of the layer.
- Click on the small square that contains the Eye
 icon for the text layer to make it visible.
- Create a New layer using the New Layer button in the layers palette or Layer Menu - New Layer
- Click on the new layer and with the text layer by clicking in the small box beside the Eye icon of the text layer. A chain link
 should appear.
- Go to Layer Menu - Merge Linked
- Select the top layer and apply the following blending modes: Overlay and Multiply. The Blending Mode menu is located at the top of the Layers palette.
- Select the Filter menu - Noise - Add Noise.
- Set the Blending Mode to darken.
- Save the text.
f) Aqua Plastic Text - http://www.absolutecross.com/tutorials/photoshop/text/aqua-plastic/
- Create a new document (8 inches wide and 6 inches high with a resolution of 300 with a background color of white).
- Use the color picker to choose a color for your text.
- Select the Horizontal Type Tool and type your name filling as much of the canvas as possible.
- Create a New layer (Layer 1) using the New Layer button in the layers palette or Layer Menu - New Layer
- Hold the Command (CTRL) key and click on the type layer to create a selection of your text.
- Select the Edit Menu – Fill and use the following settings 50% Gray, 100% Opacity and Mode – Normal.
- It is important that you do not lose the selection of the text. Switch to the Channels Palette
 (found at the top of the Layers Window). Fill the selection with white (Edit Menu – Fill).
- Select the Filter Menu – Blur – Gaussian Blur with a setting of radius 14.
- Repeat this three times first with a setting of 7, then 4 and finally 2.
- Deselect the text by using Command (CTRL) - D and then click on the Layers Palette (found at the top of the Layers Window).
- Command (CTRL) click on Layer 1 and then select Filter – Render – Lighting Effects and adjust the settings so that your text appears to have a light shining on it from the upper left..
- To get rid of some of the rough edges select Filter – Blur – Gaussian Blur with a setting of 2 for radius..
- To get a more realistic effect we need to do three procedures:
- Select Image – Adjust – Curves or Command (CTRL) and M. To use the curves menu all you need to do is click on the curve and pull the curve up or down. You will note that the graph is divided into quarters - across and up and down. For our example: click on the curve at the first quarter mark and pull it up until it almost reaches the three quarters point. Then click on the curve at the three quarters point across the graph. Do not move this point. Click OK
- Select Image – Adjust – Hue/Saturation or Command (CTRL) and U and use the following settings: Hue – 214, Saturation – 76 and Lightness - +21 and make sure the “Colorize” box is checked
- Select Image – Adjust – Color Balance or Command (CTRL) and B and use the following settings: Shadows – 0, 0, -100, Midtones – 0, 0, +93 and Highlights 0 0, 0, -15. Make sure “Preserve Luminosity” is checked
- The last thing that you will want to do is add a layers style. Double click on the layer or Select Layer – Effects – Drop Shadow or click on
- Save the text.
g) Artistic Text on an Artistic Background - http://www.tutorialized.com/tutorial/Artistic-Text-On-an-Artistic-Background/11682
- Create a new document (8 inches wide and 6 inches high with a resolution of 300 with a background color of white).
- Use the custom shape
 tool and select the leaf ornament shape. Select the Layers Menu - Rasterize - Shape.
- Select the shape using the rectangular marquee tool.
- Select the Edit Menu – Define Pattern and give the pattern a name (something like leaf1) and then press OK.
- Double click on the background layer to unlock and make it editable
- Choose the Gradient
 Tool and select Radial Gradient
  and fill the background by clicking in the upper left hand corner and drawing a diagonal across the document.
- Select the Horizontal Text Tool and use a font that is bold enough that will allow a pattern to show through.
- Double click the text layer to open the layer style window or click on and apply the following:
- Pattern Overlay – select the pattern that was created in step 4 with a Blend Mode – Hard Light and a Opacity of 100
- Gradient Overlay – Blend Mode – Normal, Opacity – 39, Style- Linear, Angle – 90 and Scale – 100
- Stroke – Size – 2, Position – Outside, Blend Mode – Normal, Opacity – 100, Fill Type – Color
- Bevel and Emboss – Style – Inner bevel, technique – Smooth, Depth – 101, Direction – Up, Size – 3, Soften – 0, Angle – 120, Altitude – 30, Highlight Mode – Screen, Opacity – 75, Shadow Mode – Multiply, Opacity – 75
- Outer Glow – Blend Mode – Normal, Opacity – 75, Noise – 0, Technique – Softer, Spread – 9, Size – 8 , Range – 50, Jitter – 0
- Use the Custom Shape tool and select the same pattern and draw to fill the background with one block of the pattern.
- In the Layers Menu click on the Menu Fly Out that is labeled Normal and select Overlay.
- Select the Layers Menu – New layer or use the New Layer Button in the Layers palette and use the Elliptical Tool to draw a circle. Remember to hold down the Shift key when drawing the ellipse so that it is constrained as a circle.
- Copy (Command/CTRL C) the layer style from the text and paste (Command/CRTL V) it on the circle layer. A second method is to Select the text layer and then Layer menu - Layer Style - Copy Layer Style and then Layer Menu - Layer Style - Paste
- Select the Layer Menu – Rasterize the layer
- Command/CTRL click to get the selection and contract the selection (Select Menu - Modify - Contract) by 5 pixels
- Feather the selection by pressing Command/CRTL ands ALT and D or Select Menu - Feather and use a setting of 20 pixels.
- Press Delete to remove the inner area of the circle.
- As an optional exercise use the Eraser tool with a soft brush setting and remove the hard lines of the circle below the text.
- Save the text.
Slime Effect -
- Create a new document (8 inches wide and 6 inches high with a resolution of 300 with a background color of white).
- Create a New layer using the New Layer button in the layers palette or Layer Menu - New Layer and label "text"
- Select the Horizontal Text Tool and use a font that will create text (example - "No Limits") with distinctive points.
- Select the Layer Menu - Rasterize - Text.
- Duplicate the layer by selecting Layers - Duplicate or press the Control (Right Click) key and click on layer and select Duplicate layer and label "slime".
- Hold down the Command (CTRL) key and click on the text layer. This procedure will load a selection around the text (small moving lines).
- Click on the foreground color of the color selection button and choose a gross green color (R - 107, G - 186, B - 64).
- Fill the selection with the foreground by pressing the Alt key and the Delete (backspace ) key. Do not loose the selection.
- Add a layers style by double clicking on the layer or Select Layer – Effects – Drop Shadow or click on and use the following settings:
- Bevel and Emboss - Inner Bevel - Smooth, Depth - 100%, Direction - Up, Size - 5, Soften - 0
- Satin - Multiply, Color - Black, Opacity - 50%, Distance - 11, Size - 14, Contour - Invert
- Color Overlay - Screen, Color (R - 107, G - 186, B - 64), Opacity - 70
- Deselect the text by using Command (CTRL) - D.
- Select the Filter Menu - Liquify. Note: A menu will appear that will allow the setting of a brush size. Select a size that is a little larger than the width of your text. Drag down components of the text which would be affected by the pull of gravity.
- Hide the first layer .
- Optional:
- Select the Layers Menu – New layer or use the New Layer Button in the Layers palette and label "wall"
- Click on the foreground color of the color selection button and choose a browny red color (R - 123, G - 18, B - 38).
- Fill the selection with the foreground by pressing the Alt key and the Delete (backspace ) key or use the Paint Bucket
 tool in the Tools palette.
- Select the Filter Menu - Texture - Texturize with settings Texture - Brick, Scaling - 100%, Relief - 4, Light - Top
- Drag the wall layer below the text layer. Select the text layer.
- Use the Opacity Tab
 at the top of the Layers palette and move the slider to read 90.
- To apply atexture to the text select the Filter Menu - Texturize with settings Texture - Brick, Scaling - 100%, Relief - 4, Light - Top.
- Save the text.
Text on a Water Surface - http://www.photoshoptutes.com/text_on_the_water.html
- Create a new document (8 inches wide and 600 inches high having a resolution of 300 with a white background and black foreground).
- Select the Brush Tool
 from the Tools palette with the following settings: Airbrush Pen
  (located below main menu bar) with Opacity and Flow - 100 and a Master Diameter (Brush dropdown menu
 { located below main menu bar }– 30 px and create the text “Water”.
- Select the Filter Menu
- Texture – Patchwork with settings of Square Size – 2 and Relief – 19
- Blur – Gaussian Blur – Radius 2 (2px)
- Artistic – Plastic Wrap – Highlight Strength – 20, Detail – 12 and Smoothness – 6
- Select the Image Menu – Adjustments – Hue/Saturation – Hue – 200, Saturation – 100, Lightness – 0 and Colorize – On.
- Save your text
Melting Snow - http://www.tutorialized.com/tutorial/Melting-Snow-Text/22162
- Create a new document (8 inches wide and 600 inches high having a resolution of 300 with a black background and white foreground).
- Select a font that would provide text that appears to have a nice rounded edge. Type the words “Melting Snow”.
- Select the Layer Menu – Rasterize
- Select the Filter Menu – Stylize – Wind with settings – Method – Wind and Direction – From the Left.
- Select the Image Menu – Rotate Canvas – 90 CW.
- Select the Filter Menu – Stylize – Wind with settings – Method – Wind and Direction – From the Left.
- Select the Filter Menu – Stylize – Wind with settings – Method – Wind and Direction – From the Right.
- Select the Image Menu – Rotate Canvas – 90 CCW.
- Command click on the text layer and select the Layers Styles button at the bottom of the Layers palette.
- Select the following Layers styles :
- Bevel and Emboss – Style – Inner Bevel, Technique – Smooth, Depth – 100, Direction – Up, Size – 5, Soften – 0, Angle – 16, Altitude – 30, Contour – diagonal, Highlight – Screen, Opacity – 75, Shadow Mode – Multiply, Color - Black and Opacity – 75
- Texture – Pattern – Notebook (locate by clicking on right arrow and select Color Paper option ), Scale – 582, Depth - +1000, Invert and Link with Layer selected.
- Satin – Blend Mode – Multiply, Opacity – 28, Angle - -37, Distance – 53, Size – 4, Contour – Peaked - Invert and Anti-aliased selected.
- Color Overlay – Blend Normal – Normal, Opacity – 100
- Save your text
Cool Electric - http://www.adobenerds.com/Learn-how-to-create-a-cool-electric-Text-Effect-by-following-this-step-by-step-tutorial_56.html
- Create a new document (8 inches wide and 600 inches high having a resolution of 300 with a black background and white foreground).
- Press Command (CTRL) + D.
- Select the Filter Menu – Render – Difference Clouds.
- Select the Image Menu (Command + U) - Adjustments – Hue/Saturation – Hue – 205, Saturation – 75, Lightness – 0 and Colorize – On.
- Select the Text Tool in the Tools palette and create a bold style text “Electric”. Alternate procedure: use the Pen Tool in the Tools palette and free hand the same text.
- Command (Right ) Click anywhere on the document and select the Edit Menu – Make Selection – Feather Radius – 0 and New Selection selected.
- Press Command (CTRL) and the “J” key to place text on a new layer and label “Text”.
- Go to the select Menu – Modify – Expand – 4
- Click on the new Layer button at the bottom of the Layers palette and create a new layer.
- Select the Edit Menu – Stroke with settings Width – 2, Color – red, Location – Inside, Blending Mode – Normal and Opacity – 100
- Double click the layer or select the Layers Style button at the bottom of the Layers palette and then select Outer Glow – Blend - Normal