PhotoGraphic Edges
- Soft Fade Vignette Effect
- Creating Unique Photo Edges
- Photo Edges – Quickmask
- Funky Photo Edges
- Burned Edges
- Feathered Edges
- Cool Edges
- Framing a Picture
Soft Fade Vignette Effect - http://graphicssoft.about.com/cs/photoshop/ht/apsvignette.htm
- Select the File Menu – Open to open a photo.
- Double Click on the background layer to make it an editable layer
- Select the Elliptical Marquee
 Tool.
Tool.
- Drag a marquee selection around the part of the photo that you wish to keep
- Click on the Add Layer Mask
 button at the bottom of the Layer palette.
- Select the Filter Menu – Blur – Gaussian Blur and adjust the radius to determine the amount of fade. Click OK
- To add a background add a new layer (select Layer Menu – New Layer or click on New Layer
 button at the bottom of the Layers palette) below the photo layer and fill with a desired background.
- To paint in the layers mask with shades of gray click on the thumbnail in the Layers Palette to activate it for painting.
- Save your picture
Note: if a paintbrush icon appears next to the eye icon in the Layers Palette the layer is active
- if a mask icon appears then the mask is active
- If the effect is not correct drag the mask thumbnail to the trash located at the bottom of the Layers palette
- To reposition the vignette click the link icon between the layer thumbnail and the mask thumbnail and move the mask independently of the layer. Remember to relink when finsihed.
Creating Unique Photo Edges - http://www.myjanee.com/tuts/edges/edges.htm
- Practice will involve making a layer Mask, using the Crop Tool, and working with layers.
- Select the File Menu – Open to open a photo.
- Use the Cropping Tool
 select the main subject from the photo making sure it is centered. It is recommended that you have more in the picture than less. Then select the Image Menu - Crop.
- Double click on the background layer to unlock and make it editable.
- Select the Layers Menu – New layer or use the New Layer Button in the Layers palette to create a new layer.
- Choose white for the foreground
 color and press Alt - Delete to fill the layer with white. Make sure the white layer is below the photo layer. To move a layer just click on the layer and drag to required location.
- Click on the photo layer and then use the Rectangular Marque
 tool to make a selection around the focal poin tof your photo. It is recommended that you have a wide margin .
- Convert the selection to a Layer mask by clicking on the Layer Mask button at the bottom of the Layers palette.
- Note: when the mask is active a mask icon is visible in the activity column of the Layers palette. if you click on the photo icon
 for the layer a paintbursh will become visible, clicking on the mask icon
  returns activates the mask layer process.
- To experiment with different filters it is recommended that your create several copies of your masked photo layer. To make a copy of a layer click on that layer and drag it to the New Layer button at the bottom of the layers palette.
- To use one layer at a time turn the visibility off by clicking on the eyes icon
 for each layer. Remember to keep the background layer visible.
- Select the Filter Menu and then in turn try some of the following:
- Pixellate - Crystallize, Cell Size - 43 Note: if you cannot see the edge of your picture in the preview window move the mouse over the window and a hand will appear. This will allow you to drag the preview around until an edge is visible.
- Distort - Glass, Distortion - 14, Smoothness - 3, Texture - Tiny Lens
- Stylize - Extrude, Blocks, Size - 30, Depth - 30, Random
- Blur - Gaussian
- Experiment with other types of Filters and their settings. I recommend that you record which Filters provided the best results.
- Save your picture
Photo Edges – Quickmask - http://www.photoshopcafe.com/tutorials/edges/edges.htm
- Open a picture.
- Use the Rectangular Marque tool and make a selection around the inside of the image.
- To make the border part active the selection must be inverted. Use the Select Menu – Inverse or use Command (CRTL) – Shift - I.
- To apply the quickmask press the Quickmask
 tool on the Tools palette or press the “Q” key. Note: the pink colored area indicates the masked area that will not be affected and the area in basic color represents the component that will be affected by filter application
- Select Filter – Distort – Ripple with settings of Amount - -512 and Size – Medium.
- Turn off the quickmask by either selecting the Quickmask button or pressing “Q” a second time.
- Invert the selection using the Select Menu – Inverse or use Command (CRTL) – Shift - I.
- To move the selection to a new layer press Command (CRTL) – Shift – J.
- Select the background layer and using the Color Selection button in the tools palette make the foreground color white.
- Fill the background with white using either the Paint Bucket
 button in the Tools palette or pressing Alt – delete (backspace).
- Select the Layer styles button in the Layers palette and apply a Drop Shadow. Experiment with the settings.
- Try different filters and make note of which filters provide the best photo edges.
- Save your picture
Funky Photo Edges – http://www.digitalscrapbookplace.com/university/tutorials/PS_funkyphotoedges_as.shtml
- Open a picture.
- Select the Crop Tool from the Tools palette. To control the size of the crop
 set the width to 5 inches and the Height to 7 inches and the Resolution to 200.
- Click on the picture and drag across the picture including the main focal points of your picture. Select Image Menu - Crop
- Note: it is recommended that the layers name relate to what it represents. To change the name from Layer 1 or Layer 2 just click on the name and when a bounding box appears type in an appropriate name.
- Create a copy of the layer by clicking on the layer and dragging it to the New Layers button at the bottom of the Layers palette or use Command (CRTL) – J.
- Make the new layer active and select the Image Menu - Canvas – Size and add 1 inch to both the height and width. Make sure that Relative is selected.
- Load the duplicate layer by pressing the Command (CRTL) key and click on the thumbnail. Note: it will appear as a dashed line that appears to move.
- Do not lose the selection.
- Create a new layer by clicking on the New Layer button at the bottom of the Layers palette.
- Click on the Layers Style
 button at the bottom of the Layers palette and select Stroke using the following settings: Width – 70, Color – your choice, Location – Inside, Mode – Normal, Opacity – 100 and then click OK.
- Add a new layer.
- Create a selection of the duplicate layer by pressing the Command (CRTL) key and clicking on the thumbnail in the layers palette. Click on the new layer
- Hide the stroke layer by clicking on the eye icon of the stroke layer.
- Select the new layer and click on the Quickmask tool in the Tools palette or press the “Q” key. Note: the pink colored area indicates the masked area that will not be affected and the area in color represents the component that will be affected by filter application.
- Select the Filter Menu – Brush Stroke – Spatter and use the following settings: Spray radius – 25 and Smoothness – 8. Click OK
- Turn off the quickmask by either selecting the Quickmask button or pressing “Q” a second time.
- Use the Color Selection button in the tools palette to make the foreground color black or some other color that you would like to use..
- Fill the layer with black using either the Paint Bucket button in the Tools palette or pressing Alt – delete (backspace).
- Hide all the other layers and the result will be a photo edge that can be used for a 5 x 7 size photo.
- Use various blending modes, opacity, and distortion to modify the photo edge.
- If this edge is to be used for other pictures first discard the layer mask by dragging it to the trash icon in the layers palette and then select the Layers Menu – Merge and save as a frame. To apply to another picture open the picture file, open the frame file and drag it onto the picture. Resize as necessary and cut out the center using the Rectangular Marque tool or Elliptical Margue tool and pressing the Delete key.
- Save your picture
Burned Edges – http://www.myjanee.com/tuts/burn/burn.htm
- Open a picture.
- Double click the picture layer in the Layers palette to change the locked background into an editable layer.
- Create a border around the picture by either making the picture smaller (click on the picture layer and select the Edit Menu – Transform – Free Transform and then grab the corner handle of the bounding box and while holding down the Shift key drag towards the center of the picture. Holding down the Shift key keeps the proportions the same) or making the canvas larger (select Image menu – Canvas size and add an inch to the width and height).
- Create a new layer by selecting the New Layer button at the bottom of the Layers palette.
- Select the Color Button in the Tools palette and choose a foreground color for the matting.
- Use Alt – Delete (backspace) or the Paint Bucket to fill this layer.
- Reduce the Opacity of this layer so that the picture appears underneath.
- Add a Layer Mask by clicking on the Layer Mask button at the bottom of the Layers palette.
- Select the Rectangular Marque tool in the Tools palette and cut the matting for your picture.
- Select the Color Button in the Tools palette and choose a foreground color of black.
- Use Alt – Delete (backspace) or the Paint Bucket to fill this layer.
- Click on the matting layer and return the opacity to 100%.
- Select the Color Button in the Tools palette and choose a foreground color of white.
- Use the Paint Brush
 tool in the Tools palette and experiment as you paint on this layer.
- Note: control the paint brush by selecting a Paint Brush size by clicking on the Paint Brush Size icon. Scroll down and pick a brush with a soft edge. Use the slider to change the Brush diameter.
 Other items that can be controlled include Mode, Opacity and Flow
- Alternatives:
- Click on the Paint Brush tool and select the Airbrush icon and use feathered and paint a border.
- Select the Gradient Tool
 in the Tools palette and then select a Linear Gradient
  . Click on the upper left hand corner of the picture and drag diagonally across the picture.
- Click on the Paint Brush and paint around the border. Select the Smudge Tool
 in the Tools palette and smudge the edges.
- Select the Color Button in the Tools palette and choose a foreground color of white. Use Alt – Delete (backspace) or the Paint Bucket to fill the mask layer. Use the Elliptical Marque tool and make a selection. Go to the Select Menu – Feather – 10 pixels. Fill the selection with black. Press Command (CRTL) – D to deselect. Go the Select Menu – Feather – 0.
- Select the Color Button in the Tools palette and choose a foreground color of white. Use Alt – Delete (backspace) or the Paint Bucket to fill the mask layer.
- Select the Rectangular Marque tool in the Tools palette and cut the matting for your picture.
- Create a new layer by selecting the New Layer button at the bottom of the Layers palette.
- Select the Color Button in the Tools palette and choose a foreground color of brownish orange. Click on the Paint Brush and paint a border around the picture using a shaky hand approach.
- Select the Filter Menu – Blur – Gaussian Blur.
- Create a new layer by selecting the New Layer button.
- Select the Color Button in the Tools palette and choose a foreground color of Black. Click on the Paint Brush and paint a border around the picture using a shaky hand approach. Select the Filter Menu – Blur – Gaussian Blur.
- Select the Lasso Tool
 in the Tools Palette and trace a selection through the black using the same shaky hand approach.
- Invert the selection using the Select Menu – Inverse or use Command (CRTL) – Shift - I. Click on the Delete key.
- Using the same selection click on the orange layer and press the Delete key.
- Click on the matting layer (not the mask) and press the Delete key.
- If a part of the picture still shows outside the border, click on that layer and press the Delete key.
- Press Command (CRTL) – D to deselect.
- Save your file.
- If this edge is to be used for other pictures first discard the layer mask by dragging it to the trash icon in the layers palette and then select the Layers Menu – Merge and save as a frame. To apply to another picture open the picture file, open the frame file and drag it onto the picture. Resize as necessary and cut out the center using the Rectangular Marque tool or Elliptical Margue tool and pressing the delete key.
- Save your picture
Feathered Edges - http://www.loriswebs.com/tutorials/featherededges.html
- Open a picture.
- Use the Color Button in the Tools palette and select the color black for the background color.
- Create a new layer by clicking on the New Layer button at the bottom of the Layers palette and fill this layer with the background color by pressing Command – Delete.
- Select the picture layer and use the Rectangular Marque tool or the Elliptical Marque Tool and make a selection around the inside of the image with the focus on having an even border.
- Use the Select Menu – Feather and chose a radius of between 4 to 12 pixels. No change may be visible.
- Select the Edit Menu – Copy or use Command (CTRL) – C to make a copy of the selected component of the picture.
- Create a new layer by clicking on the New Layer button at the bottom of the Layers palette. Make sure that this is the top layer.
- Note: To move a layer click on that layer and drag it to the required position.
- Select the Edit Menu – Paste or use Command (CTRL) – V to paste the copy into this new layer.
- Click on the Eye
 icon of the background layer to hide this layer.
- Save your picture
Cool Edges – http://www.tutorialwiz.com/cool_edges/
- Open the image that is to be edited.
- Reset the Color Buttons to black/white by pressing the “D” key.
- Select the Image Menu - Canvas – Size and add 1 inch to both the height and width which will provide enough room for a border.
- Use the Rectangular Marque tool and make a selection of the image that is about 1/2 inch (30 – 40 pixels) smaller than the image.
- To make the border part active the selection must be inverted. Use the Select Menu – Inverse or use Command (CRTL) – Shift - I.
- Go to the Select Menu – Feather – 4 to soften the edges.
- Go to the Filter Menu – Sketch – Torn Edges with settings of Image balance – 50, Smoothness – 5 and Contrast – 20.
- Try other Filters such as Distort – Ocean Ripple or Sketch – Chalk and Charcoal.
- Save your images.
Framing A Picture – http://www.myjanee.com/tuts/frame/frame.htm
- Open an image that is to be edited.
- Double click the picture layer in the Layers palette to change the locked background into an editable layer.
- Select the Image Menu - Canvas – Size and add 2 inches to both the height and width which will provide enough room for a mat.
- Create a new layer by clicking on the New Layer button at the bottom of the Layers palette. Label this layer “mat”. Move this layer below the image layer.
- To color the mat layer select the Color Button from the Tools palette and pick an ivory shade as the foreground color. To fill the layer with the foreground color press the Alt key and the Delete key.
- To add design and texture to the mat select Filter – Noise – Add Noise and Filter –Brushstrokes – Crosshatch with the settings of Stroke Length – 49, Sharpness – 2 and Strength – 2.
- Create a new layer by clicking on the New Layer button at the bottom of the Layers palette.
- Select the Rectangular Marque tool and draw a rectangle about 1 inch wide along the long side of your picture. Make sure that it extends will beyond the edges of the picture.
- Select the Gradient Tool from the Tools palette and further select Reflected Gradient Tool from the Gradient Menu
 . Located just below the main menu bar.
- Click the Gradient Window
 (just below the main menu bar).
- In the pop-up menu
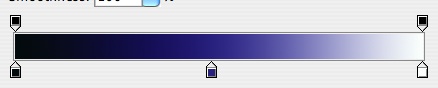 click on the left hand color stop (located below the gradient and on the left side) and select the color black, click on the middle color stop and select a gold shade, and click on right hand color stop and make it black (located below the gradient and on the right side) Click OK
- In the middle of the area selected drag the gradient across the frame. Note: hold down the Shift key so that the gradient goes at right angles to the rectangle.
- Press Command – D to deselect.
- Select the Rectangular Marque tool and draw a smaller rectangle inside the first making sure that it extends to the ends of the first rectangle.
- Select the Linear Gradient from the Gradient Menu and from the middle of the selected area draw a gradient in the opposite direction to the first.
- Press Command – D to deselect.
- Drag this layer to the new layer icon in the Layers palette. Repeat two more times. This creates the four parts of our frame.
- Select one of the new layers and then select the Edit Menu – Transform. The pointer outside the bounding box so that it becomes a turning arrow. Rotate the frame. Remember to hold down the Shift key so that the image remains constrained (straight). When rotating the frames keep in mind that the corners must match (Fully overlap)
- Repeat for the remaining components of the frame. Position the pieces of the frame around the picture keeping in mind the main focus of the picture and that it will have a mat. Make sure that the components of the frame overlap in the corners
- To create mitered corners parts of the frame must be cut off. Select a layer that has a frame that overlaps another frame and then select the Polygonal Lasso
 tool in the Tools palette and click on the inside corner. Hold down the Shift key (to constrain selection to 45 degree increments) and then click on the outside edge of the frame (like the hypotenuse of a right triangle). Next click on a point that is outside of the frame and beyond the inside corner. Double click to close the triangle.
- Press the Delete key to remove the created triangle.
- Press command – D to deselect.
- Repeat for the other corners.
- Select the appropriate layer and use the Rectangular Marque tool to select areas that extend beyond the edges of the frame and press the Delete key. To better position the selection use the arrow keys.
- Select one of the frame layers and then click on the little box next to the Eye icon of the other frame layers. When the box is clicked a chain
 link appears and indicated which layers are linked together.
- Go to the Layers Menu – Merge Linked or press Command – E.
- Select the Rectangular Marque tool and make a selection on the picture where the mat edge is to exist.
- Drag the picture layer below the mat layer. Select the mat layer and press the Delete key . Do not lose the selection created in the picture layer.
- Press Command – D.
- Select the mat layer and then select the Layers Style at the bottom of the Layers palette, Select Drop Shadow or Bevel and Emboss and add a layers style.
- Apply the same effects to the frame layer.
- Save your image.