Animation Concepts
The information that is provided in this section
is based on my interpretation and adaptation of the work of Tony White from
the book The Animator's Handbook.
[ Inbetweening ]
[ Using Key Points ] [ Superimposition
] [ Arcs ] [ Head Turns ] [ Eye
Movement ] [ Walking ] [ Running
] [ Anticipation ] [ Realistic
Touches ] [ Exaggerated Action ] [ Special
Effects ] [ Assignment One ] [ Assignment
Two ]
Inbetweening
This process focuses on the need
for drawings (pictures) between two extremes or key positions. If more drawings
are included the movement produced will be slower and if fewer drawings are
included the illusion of faster movement will be created. To help animators
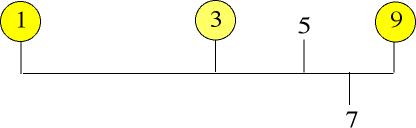
an inbetweening chart is used. The numbering used in the chat is based on
an even number of inbetweens because when two odd whole numbers are added
together and divided by two the result is a whole number.

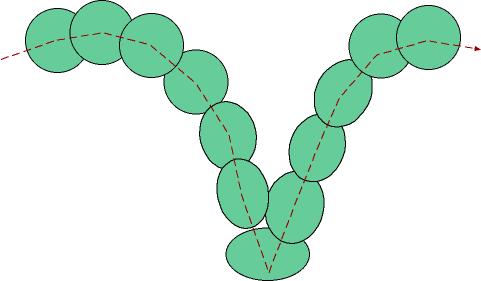
In the above inbetweening chart,
frame-1 and frame-9 represent the key positions. Frame-5 represents the first
inbetween half way between the key positions. Frame-3 indicates the need for
an inbetween halfway between key frame-1 and the first inbetween. Similarly,
frame-7 is the inbetween half way between frame-5 and key frame-9.
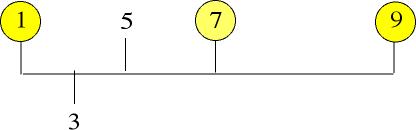
If an animator wishes to create
the illusion of slowing down there would be more inbetweens at the end and
the chart would appear as;
If an animator wishes to create
the illusion of the action speeding up there would be more inbetweens at the
beginning and the chart would appear as;
If an animator wishes to create
the illusion of the action speeding up and then slowing down there would be
more inbetweens at the beginning and end and the chart would appear as;
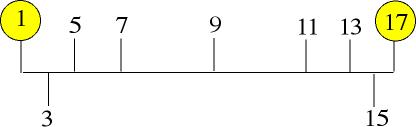
In certain circumstances
in which a soundtrack for example limits the number of possible inbetweens
the animator may be forced to use the idea of thirds to create the illusion
of smooth motion and the chart would appear as:.

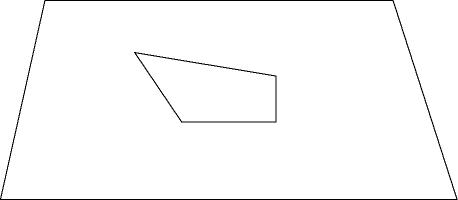
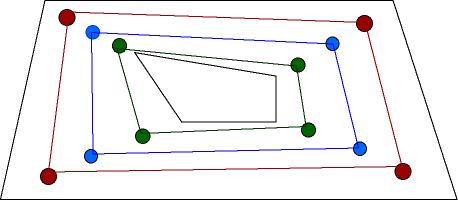
Using Key
Points
These are useful when changing shapes and form between two key
drawings. It requires the animator to select "key points" the link
various midpoints of the two shapes. When these points have been chosen the
first inbetween is drawn and then the process is repeated until all necessary
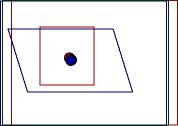
inbetweens have been drawn. The following example illustrates this point.
The inside geometric shape represents the first key position and the outside
geometric shape presents the final key position.
The blue geometric shape represents the first inbetween, the
green geometric shape represents the second inbetween and the final inbetween
is represented by the red geometric shape.
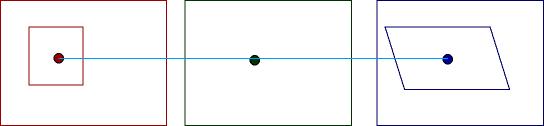
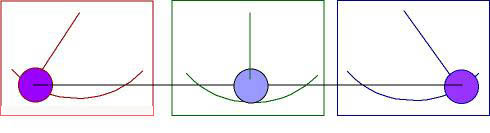
Superimposition
This is required when both shape and position are changing.
Demands greater visual judgment.
Steps:
- identify the center of each shape and draw a line connecting the two centers
- identify the location of the center of the first inbetween
- superimpose the top key frame (final position and shape) over the bottom
key frame (initial shape and position) so that the centers of the two shapes
are aligned
- the first inbetween sheet (breakdown sheet) is superimposed on the other
two sheets aligning all three centers.
- it is critical that everything is kept square
- proceed as you did when using key points
- repeat this procedure if additional inbetweens are required between the
first key frame and the breakdown sheet and the breakdown sheet and the last
key frame
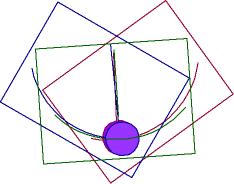
Arcs
In many instances movements or actions do not occur in a linear
or straight line. If the procedure from above is followed for a pendulum swinging
back and forth the result would not be an arc or curved path of motion. The
blue circle is the diagram below illustrates this point.
It is necessary to superimpose the key frames and the first inbetween (breakdown
sheet) in such a way as to have the arms and centers of the pendulum line up.
The identified centers and arms act as the key points.
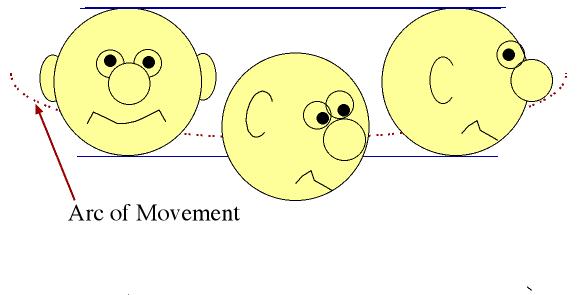
Head
Turns
Straight line movement makes it appear mechanical. The illusion
that is created is one of the parts of the face sliding across.
The natural path is for the movement to be in an arc.
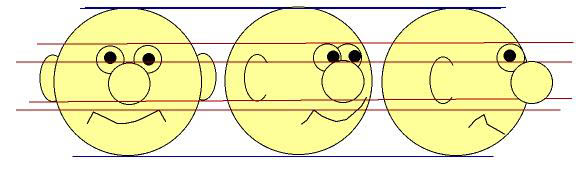
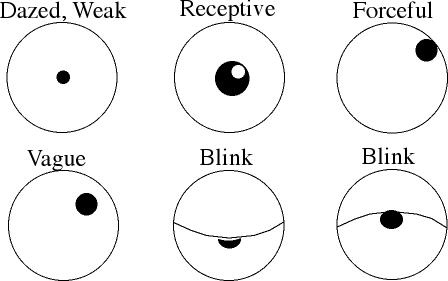
Eye Movements
The eyes lead the direction of motion. When the head turn rapidly
from side to side the eyes may blink or half close. If fewer inbetweens are
used from open to closed or from closed to open the illusion created is one
of being alert and intelligent. On the other hand if more inbetweens are used
the illusion of sleepier or not with it is created. The movement of the pupils
follows the same requirement as that of the head and that is all motion must
be in an arc to create the illusion of natural motion. It is also important
to note that when the pupil moves on the side of the eyeball there should be
a slight stretching of the eyeball at the point of contact. When eyes blink
the eyelid must be curved never straight across. If a sleepy blink is to be
created the pupil should be carried down with the eyelid. A squint of disbelief
is created when the top and bottom eyelids meet in the middle. The positioning
of the pupil play a very important role in conveying the character's expression.
For example:
- if the pupil is small the character will appear to be dazed, weak or unconvincing
- if the pupil is large the character will appear to be receptive and interested
- if the pupil touches the rim of the eyeball the character will appear as
being forceful
- if the pupil is off center and surrounded by white the character will vague
Walking
Walking is based on the interaction of head, arms, body and legs
and because of this complex interaction it is necessary to study it in sections.
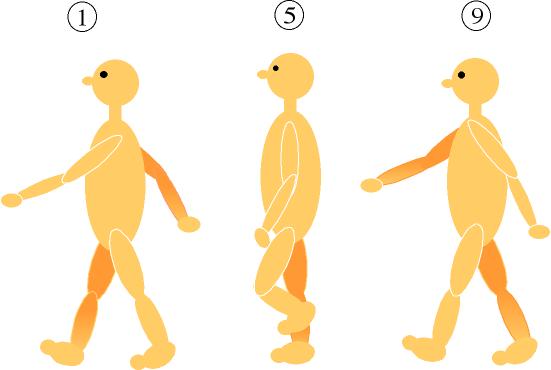
a) Legs and Lower Body
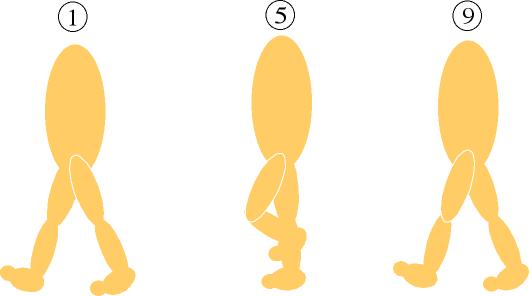
To understand the positioning of the legs as you walk one of the best exercises
that you can do is to watch another person walking and study the positioning
of the upper leg, lower leg foot and toes. The above diagram illustrates the
key positions and the first inbetween - referred to as the passing position
- as the right leg is moved forward. It is suggested that you copy the diagram
and draw the remaining two inbetweens (frame-3 and frame-7). It is important
to remember that the body weight is always in balance with leg positions unless
you are trying to create the illusion of someone being off-balance - for example
a stumble. The other important note is that the body position is raised in
the passing position between the two extremes. The raised body position is
the result of the leg being straight directly beneath the body which forces
the body upward. The positioning the toes and heel are also important because
they serve as balance points preventing the body from falling backwards or
forward's.
In some cases it is easier to use a walk cycle. This is accomplished by having
the character walk on the spot and having the background pass through the
scene. The walk is done lifting the body vertically, sliding the foot backward
to the middle position and the free leg positioned in the normal passing position.
The background must move in the reverse direction. If the character is to
have the illusion of moving from left to right then the background must be
moved from right to left. The background pan must move at exactly the same
speed as the slide of the contact foot.
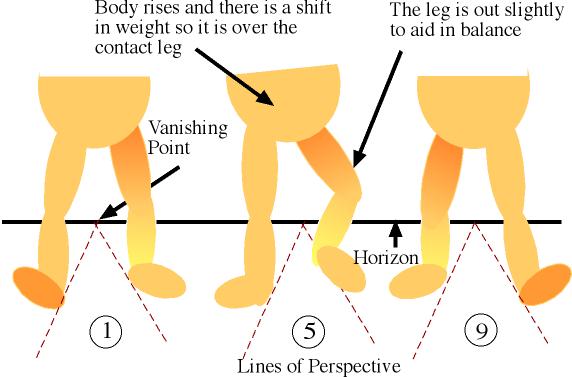
b) Front-On Walks
With the front-on walks you use the same principles that were used with the
profile walk. The key points are:
- the heel of each foot follows the line of perspective which converges at
the vanishing point on the horizon.
- the body rises as a step is taken with a weight shift so that it is over
the contact leg
- the leg that is off the ground is bent out slightly as an aid in balance
If a walk cycle is to be used the background must be animated and not panned.
In simple terms the background must shrink in perspective as it moves into the
distance. The principle of the profile walk is followed and that is - however
far the contact foot slides on the cycle the background objects must move the
same distance when they move in the background animation. When animating a background
it is recommended that a cycle of action be used that can be repeated: for example
a fence line or a set of telephone poles located along one side and when locating
the position of the inbetweens they will always be positioned closer to the
second key position rather than being in the center of two key positions.
c) Adding Arms
The standard walk is one in which if the right leg is forward,
the left arm is forward for balance. To make the walk of an individual unique,
time should be
taken to observe how people walk. Take time to observe how an
elderly man walks, or how a baby takes her first steps, or how a body builder
moves , or how a tired runner walks after completing a 10 k run. It is important
to remember that the anatomy of the character never changes therefore if you
would like the body to appear to shrink you must have the legs bend at the knees
or if the body is to appear to stretch then the body would move onto its tiptoes.
Individuality can be created by using different head, leg and arm positions
or by simply using positioning with key and passing positions and their respective
inbetweens. For example you could draw the key and passing positions with the
body in an upward motion and then drawing the respective inbetweens in a down
position. This was used to create the Mickey Mouse walk which is referred to
as a "double-bounce walk".
A general rule is that a basic walk can be drawn or filmed over
eight frames. A more natural walk is usually completed over twelve frames. If
you want to give the appearance of a fast walk it would be done over fewer frames
and the opposite would hold true for a slower walk. Furthermore, varying the
number of inbetweens between the key frames and the passing frame results in
variations in the walk.
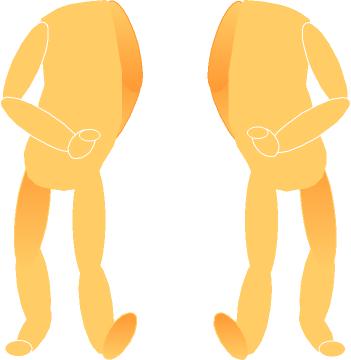 |
Other points to consider when developing a character's walk is that the
body if flexible and that joints rotate and bend.
In the diagram on the left you will note that with the left leg down
and forward the left hip has followed with a similar motion. To maintain
balance and compensate for the left leg and hip positioning, the right
arm has pulled the right shoulder down and forward while the left arm
is pulled back and up. It is also important to note the movement of arms,
hips and legs causes a twisting of the spine. Although the head was not
included in the diagram you should try to visualize how it would be moving
- swaying side to side, bobbing up and down.
To increase your sophistication in the art of animating a character's
walk use your own body as a guide and remember to observe those around
you.
|
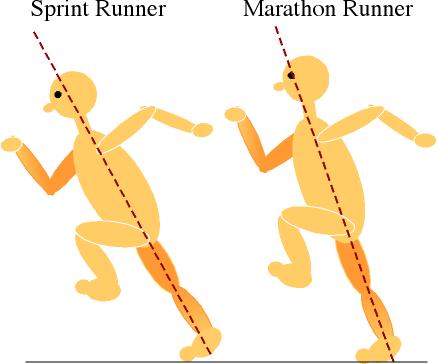
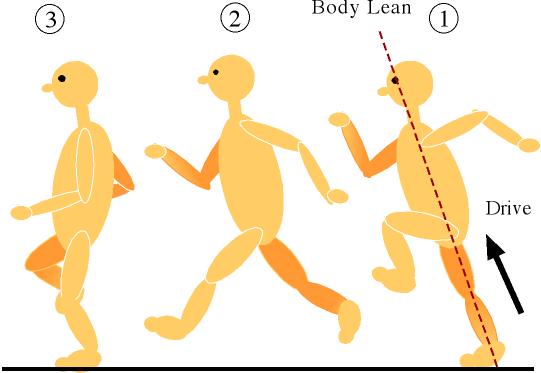
Running
The rules that controlled how a walk was portrayed
are in effect for the run but with a shift towards the more dynamic. The up
and down movement is more exaggerated than in a walk because of the upward drive
created by the push-off leg - the one in contact with the ground. In fact, the
first inbetween or passing motion should have the runner off the ground. Arm
movement is more vigorous and the use of the arms is critical within the total
context of running. The arm is usually bent because it can be moved more quickly
than a straight arm. In addition, the body lean is more pronounced and the stride
covers a lot more ground.
In runs that require speed over a short distance
and interval - a sprint, the runner must exhibit explosive movement with more
body lean. In a more relaxed run - a conditioning jog, the runner presents the
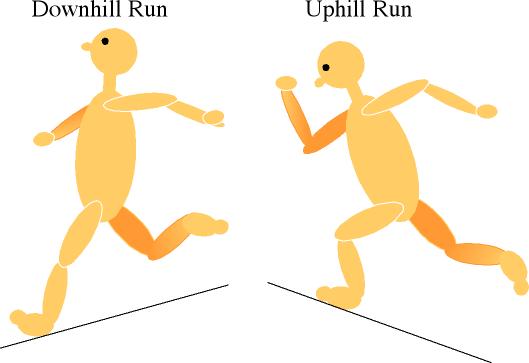
image of being more relaxed and upright. When a character is running uphill,
the character's body should be leaning forward and the arms driving harder and
if the run is downhill there should be an observable lean backwards and the
arms should be more open.
The key positions dictate the type of run that
is to unfold and because running it tied to speed it is recommended that the
inbetweens be on the ones instead of the twos.
In a run the key components include:
- to start the run the body weight shifted
ahead to the point where it is out of balance with the contact foot.
- in the stride both feet are off the ground
and it is the drive off of the contact foot that results in the body rising.
- the landing or contact position results in the bending of the contact leg
so that the weight of the body is cushioned. The appearance created is one
of a slight sinking of the body while the far arm drives through preparing
to the next component of the run.
Anticipation
The major component for any action is the need to anticipate what is going
to happen just prior to it happening. The anticipation that is created must
be convincing to the audience. To better understand the concept consider the
following examples.
- Imagine a sprinter in the starting blocks. The first component is the sprinter
setting himself in the starting blocks. When ready, both the sprinter and
the spectators wait for the sound of the gun. With the sound of the gun the
sprinter moves back slightly before exploding out of the blocks.
- Imagine a figure skater. The first component is the skater gathering speed.
When sufficient momentum has been attained, the skater begins to glide. The
audience now waits for the moment when the skater begins the execution of
a jump. The moment occurs when the skater throws his arms up, plants the toe
of his skate and his body starts to leave the ice.
For an animated character the process usually occurs in three stages:
- the static pose
- a wind-up anticipation
- a particular action
Anticipation works for any type of action. Examples:
- If a character was to run out of a scene we could start we a thoughtful
pose, then a shifting of the body backwards (arm thrown back and leg lifted
off the ground) and finally the actual run.
- If a character was attempting to reach an apple on a branch we would start
with a longing look at the apple, then a squashing of the body downwards (a
bending of the knees and arms bent at the elbows and pulled back) and finally
the jump.
- If a character was attempting a drive off a ten meter tower we would start
with a long silent look at the water below, then a squashing of the body downwards
(a bending of the knees and arms bent at the elbows and pulled back and head
bent down) and finally the drive off the tower.
One of the points to remember is that the eyes should always lead the way for
the action.
Realistic Touches
a) Weight
To accurately portray a character, the weight of the
character must be considered. The movements of a thin character running should
appear quick and as if he were skimming along the surface of the ground while
a heavy set person should appear to move more slowly. Tony White uses the concept
of a bouncing ball to describe weight and he expresses the belief that the principles
that apply to the bouncing ball apply to everything that moves.
As a ball falls towards the ground it starts to distort slightly
and when it strikes the ground it loses its round shape and as it moves up from
the ground it starts to elongate and then as the ball reaches its highest position
it returns to its normal shape. Translating this to a character walking or running
we would need the character to squash as it touches the ground and as the body
leaves the ground there would be a natural elongation before returning to the
normal shape. The degree of squashing would be tied to the activity and the
weight of the character. The lighter the character the less squashing.
b) Carrying a Weight
When a character is to transport a heavy object such as a bag
of cement his whole posture and manner of movement must change. To maintain
balance the idea is that the more weight that is to be carried the greater the
degree on body lean in a backward direction. In addition to the backward lean
there is a need to have flexing at the knees. There is also the need to change
body posture from the initial point of holding the object, the start of a walk
and finally carrying of the object from one point to another. For example:
The character is to carrying a television set from the front door to the
living room. Initally we would see the character with the telvision in his
arms, his body bent back at the hips and his knees bent. The first steps would
be slow and difficult. When momentum is achieved the body lean would decrease,
the steps would be easier and his speed could increase. The reverse must be
applied when the character is coming to a stop and is ready to set the television
down.
Other points to consider is the size and strength of the character and whether
the object is being carried in front (backward lean) or to one side (sideways
lean) or if the object is being pushed or dragged.
It is important to use the concept of anticipation when trying to convey the
idea that the character is carrying or moving a heavy object, For example if
a heavy object is to be thrown it may be necessary to include a few swings before
actually throwing the object.
c) Flexibility
A characters flexibilty helps convince the audience about what is happening.
Remember that not all parts of an action occur at the same time but are rather
a succession of movements. When considering an action the body part that leads
the action must be determined and then which parts follow through. For example:
If a character is to throw a ball. The feet must be set firmly on the ground.
The body leans slightly back and the throwing arm is brought back , bent at
the elbow, hand near the head and there is a twisting of the shoulders. The
throw occurs with the arm being brought forward and straightening in a rapid
motion. There is a squaring of the shoulders and a forward lean of the body
as the hand opens releasing the ball.
This example also demonstrates the succesive breaking of joints. As one joint
breaks it immediatley returns (breaks back) allowing the next joint to lead.
The joint break and return for this example would be first the shoulder joint,
then the elbow, the wrist and fianlly the fingers. It is important to remember
that there are limitations to flexibilty of joints and there should never be
excessive breaking of joints resulting in impossible positions. Rule of thumb:
use the limitations of the human body.
d) Overlapping Actions
This is the effect of the main movement on parts that are secondary to the
main movement. For example:
- If a character is waving a flag. When the hand changes direction the flag
will continue along the original path of movement until it reaches it full
length and then it will again follow the path of the hand until the hand changes
direction. Once again the flag will continue along this second direction until
it reaches its full length and then it will again follow this new path until
the hand changes direction again.
- If a character is wearing a scarf will running. When the character changes
direction the scarf will continue momentary in this original direction and
then will follow the new path that the runner is taking.
Free-moving objects attached to the main body of movement will exhibit an overlapping
action.
Exaggerated Action
a) Takes and Double-Takes
A "take" is defined as an exaggerated reaction
to an event. In simple terms the reaction that happens is more than what we
would normally expect to happen. The more violent the "take" the greater
the anitcipation in all of the movements. The "double-take" is more
exaggerated that a simple "take" and as a result the inbetweens are
more extreme.
An example of a take: A surprise encounter with someone
the character does not like:
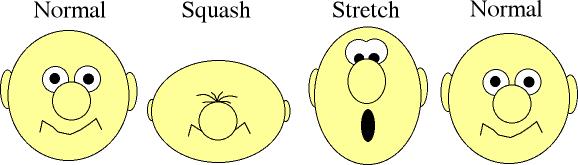
An example of a double-take: The above disgram is used and these
additional inbetweens would occur between the squash and stretch.
Full body takes and double-takes follow the same basic ideas at
the facial takes and double-takes. In addition to the squash and stretch techniques
a drag, distortion or overlap could be used.
With drag one part of the action is delayed. For example when
a character is to make a quick exit from a scene, the legs, arms and body leave
and the head remains behind. Distortion requires the manipulation of scale and
proportion. To create the effect of the face moving closer to the screen a wide
angle effect is created by drawing or modelling the head bigger and bigger.
To create the effect of the character disappearing into the background, the
character can be drawn or modelled smaller and smaller. It is important to remember
that squash and stretch techniques can be used in a more extreme fashion when
animating cartoon characters and that the degree that they can be used with
animating a human character is greatly reduced.
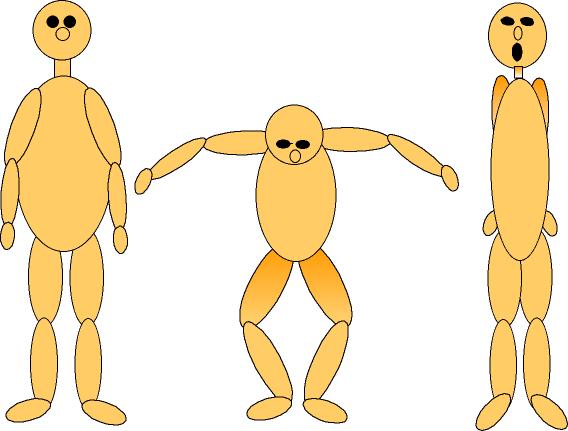
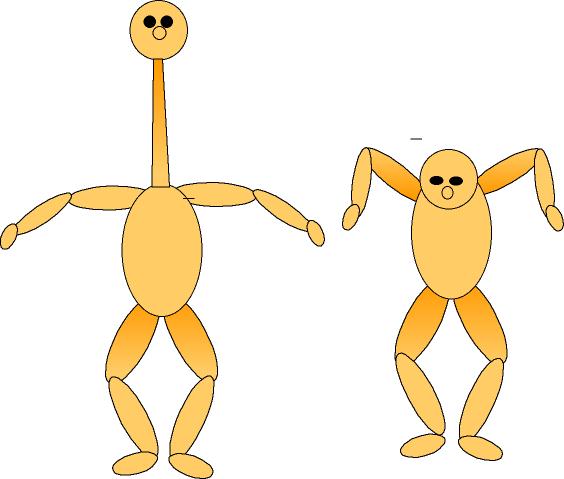
b) Sneaks
Sneaks can be classified as either slow or fast. Another name
for a fast sneak is the tippy-toe sneak. The concept of a fast sneak is for
the character to move quickly but with little or no noise. A slow sneak requires
the character moving at a more leisurely pace. All sneaks focus on the character
being on their toes. Remember, the key to a sneak is the character's attempt
to move without being seen or being heard and that each sneak is particular
to each character being portrayed. The next disgram illustrates the two types
of sneaks.
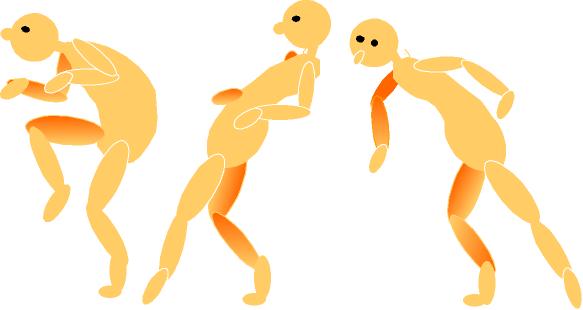
The first figure is demonstrating a fast sneak. The character
is hunched up and is as compact as possible in an attempt to create the illusion
of not being seen. All motion is accomplished with the character on his toes.
A fast sneak requires between ten and fourteen frames (pictures) per step. The
second figure demonstrates a slow forward sneak. The character is stretched
out with the body position backward and with the legs leading and the use of
the toes to create the illusion of silence.The third figure demonstrates a slow
backward sneak. Again the body is strectched out with the body position forward
as the character backs out of the scene. A slow sneak requires between sixteen
and twenty-four frames (picutres). To create the smoothest motion possible it
is recommended that all inbetweens be done on the ones.
c) Staggers
When a javelin strikes the ground the shaft vibrates for a few
moments before coming to rest. This vibration is also referred to as a stagger.
If a character were hit in the head by a snowball, the head should respond by
a motion away and a motion forward before returning back to normal. If a boxer
hits his opponent, the opponent should show a swaying motion before coming back
to his normal boxing pose.
Special
Effects
The goal when using special effects is to create a more realistic
environment with attention to atmosphere required by the story whether it be
for dramatic effect, a romantic episode or just a funny situation.
a) Wind
Props can be used to create the effect of wind - a flag fluttering,
full sails on a ship, trees bent. To have a characater exhibit the effects of
wind may require the character to lean forward as he in walking into the wind.
The stronger the wind the more pronounced the body lean. If the character is
wearing a hat, the illusion of wind can be created by having the character hold
his hat on his head as he walks forward.To create the effect of a tornado you
may have objects flying through the air.
b) Water
The key is to remember that to create flowing water, the motion
should be consistant and follow a particular path. The placement of objects
in the water should convey speed and direction. To create more dramatic water
motion whitecaps can be used. The use of reflection of moonlight or sunlight
on the surface of water can vary from water that is still to the use of waves
to show what happens to the reflection on moving water. If the reflection of
a character is to be incorporated into a scene it should be noted that unless
the water is still there should be some degree of distortion which is directly
related to the amount of disturbance of the water. The best way to create the
illusion of rain is to use diagonal lines with a background that is more subdued.
The heavier the rainfall the more the background should be out of focus.
c) Fire
If a candle is to used a minimum of three key positions are required
to produce the flame. A campfire requires a fire that flickers in a random pattern.
It is important to note that the flickering of a fire has an effect on all objects
in the scene.
d) Shadows
When drawing a shadow remember that a shadow is cast along the
ground and along the character or object. The shadow is always away from the
direction of the light source.