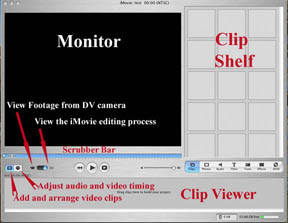
- used for two modes - importing videos from a camcorder or for viewing video
you are working with, and these two modes are located by the Mode Switch in
the lower left of the iMovie Monitor and are controlled by clicking on the
appropriate icon.
- in Edit Mode:
- the buttons at the bottom of the iMovie Monitor control playback
- the volume control is adjusted using the mouse or the Up Arrow to increase
volume and the Down arrow to decrease volume
- the playhead (a white inverted triangle) can be moved manually by dragging
it with the mouse, using the arrow keys (holding down the Shift key and
pressing the forward or backward arrow will move the playhead ten frames)
or by using the playback buttons:
- Home - moves playhead to beginning
of movie or clip.
- Play - starts the playing of the movie
or clip and the playhead moves along as the movie plays. The Play
button changes to a Stop button while the movie is playing. The Spacebar
can be used to Start and Stop play.
- Pay Full Screen - the entire screen
is used when the movie plays. Clicking on the full-screen movie stops
the movie and returns to the iMovie interface.
- the playhead moves along showing numbers indicating minutes, seconds
and what frame is playing.
- The Scrubber Bar is located at the bottom of the iMovie Monitor and
enables the positioning of the playhead and the selection of parts of
a movie. When the mouse is held over the hatch marks at the bottom of
the scrubber bar two small triangles - referred to as crop markers, appear.
The crop markers can:
- be moved from the beginning to the end of a movie be dragging them
along the scrubber bar using the mouse and the highlighted section
will turn yellow and the crop markers become solid white.
- be clicked on and then moved right or left one frame at a time using
the LEFT and RIGHT arrows.
- Be clicked on and then moved right or left ten frames at a time
if the SHIFT key is held in conjunction with pressing the LEFT or
RIGHT arrows.
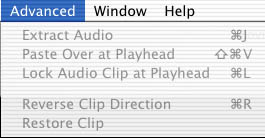
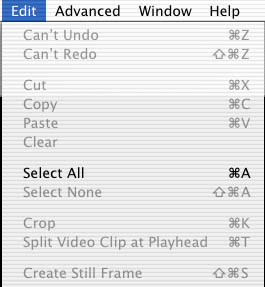
- The use of crop markers permits two different actions that are found
in the EDIT Menu:
- Cropping - deletes everything that
is found before and after the selection and saves the selection
- Trimming - deletes the selection and
saves everything before and after the selection.
- a clip or movie may be split into two or more parts by positioning the
playhead on the location of the split and selecting Split Video Clip at
Playhead from the EDIT Menu.
- In Camera Mode:
- when a camcorder is attached iMovie will generally launch and switch
to Camera mode.
- In Camera mode the buttons at the bottom of the iMovie Monitor control
the camcorder.
b) The Shelf
- iMovie imports videos as separate scenes or clips and places them on the
shelf.
- The Clips palette displays a three-by-five grid of square video-clip icons.
- The blue vertical scroll bar at the right edge of the Clips palette permits
the viewing of clips that are present beyond the fifteen that are visible.
- clips can be selected one at a time using a single mouse Click or using
SHIFT - Click for multiple selections
- clips can be dragged to the trash or dragged into the movie using the timeline
or clip viewer.
- when a clip is selected the first frame appears in the iMovie Monitor
- each clip contains the following information:
- the length in the form minutes:seconds:frames shown in the top left
corner. Any editing changes will results in an automatic change in the
shown length.
- an automatic label at the button which can be Edited by double Clicking
a clip to open a Window. Within this Window you can choose to have the
audio fade in or out and how long the fade lasts.
- contains controls for transitions, titles, effects and audio.
c) The Horizontal Displays
- permits the toggling between the clip viewer and the timeline viewer by
Clicking on the two icons.
- permits the viewing of all the scenes in the movie sequentially.
- Clip Viewer - icon of an film strip
- permits the viewing of each clip
- clips are added by dragging them to the viewer or if not needed can
be dragged back to the Shelf.(Note: using CLEAR from the EDIT menu removes
it from the viewer but does not return it to the shelf)
- clips can be rearranged
- small vertical lines indicate breaks between clips.
- Timeline Viewer - icon of a clock
- shows the clips in a movie but is scaled to time.
- Clips can be rearranged, dragged to and from the Shelf and deleted.
- The display of the timeline viewer is controlled by choosing the Views
tab from Preferences in the iMovie application menu.
- has three tracks - a video and two audio
- has three sets of controls
- Zoom Control - permits the setting of the display provided by the
timeline viewer. The default is so that the entire may be seen without
any scrolling. Greater detail in the timeline permits more precise
editing and synchronizing.
- Speed Slider - controls the speed at which a clip is played and
can be used to create special effects.
- Audio Fading - can be used to set fade in or out , volume and the
settings can be adjusted for more than one clip at a time
Palettes
|
Clip or Photo Palette
|
Audio Palette
|
Titles Palette
|
Transitions Palette
|
Effects Palette
|
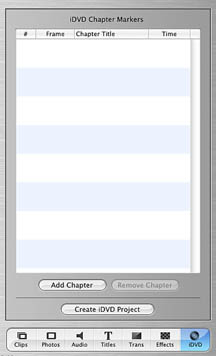
iDVD Palette
|
Menus
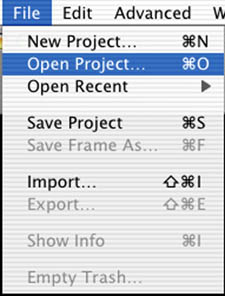
Importing Files
- Importing from a digital camcorder
- connect the digital camcorder to a Firewire port
- turn on the camera and set it to the playback setting
- click the mode switch to Camera Mode - this may happen automatically
- the buttons at the bottom of the Monitor control the Camcorder features
of play, fast forward or rewind. The camcorder controls can be used instead
of the Monitor buttons.
- to import a clip press the play button just before the section you want
to import and then click the IMPORT button.
- Note: a video may be imported as a single clip or as separate scenes
(scenes are registered by a camcorder each time it moves from standby
to record)
- Importing files
- to import a file select IMPORT FILE from the FILE MENU.
- three types of files can be imported
- DV Streams
- these are the video clips as seen on the clip shelf
- can be selected from other iMovies which in turn are placed
on the CLIP SHELF and also copied into the Project Media Folder.
- Graphics
- useful for titles and for voice over
- file formats include PICT (Mac Format), GIF, JPEG, Photoshop,
and BMP (Windows bit-mapped file format)
- Audio
- both MP3s and AIFF formats are supported
- the itunes library can be used as a source for background music
- the audio file is imported directly into the audio track of
the timeline viewer and not onto the CLIP SHELF.
Exporting Files
There are three choices for exporting files:
- QuickTime
- files can be shared with Mac and Windows computers with QuickTime installed
or can be uploaded to a web site.
- can be exported as "Web Movie - Small", Email Movie - Small",
Streaming Web Movie - Small", "CD-Rom Movie - Medium",
"Full Quality - Large", and "Expert"
- the big issue is file size and the best quality QuickTime requires a
large file size so email will not usually handle these large files and
if used on a web page download time could be unreasonable.
- if the movie is to be distributed on CD-ROM or DVD allow full video
export at 640 x 480 pixels. A safe size of 320 x 240 pixels should be
used if the movie is to be viewed on an older machine.
- The"Expert" choice addresses concerns of compression algorithms,
sample ratios, frame rates, aspect ratios and data rates.
- DV
- used to export the movie back through the camcorder and have is recorded
on a mini DV cassette
- movie can be copied from mini DV cassette to a VCR cassette for television
viewing.
- DVD
- generates a high quality DV-NTSC movie at 720 x 480 pixels with audio
at 48,000 mhz with no sound compression.
- Image File
- used to extract a particular image from a movie
- The Save Frame As command allows the saving of the visible contents
of the Monitor as an image file either in PICT or JPEG format.
- provide a descriptive title and save in an identified or new folder
Additional information:
- The Options button allows for the following:
- To see compression, frames per second and key frame settings click on
the Settings Button in the Video Panel.
- To customize the fame size click on the Size
Button in the Video Panel
- Codec Options to be consider when using Expert
Settings
- MPEG-4 is the standard for Internet movies but you must have Quicktime
6 or later.
- The Motion JPEG is used for movies on earlier computer systems
- Sorenson is good for viewing movies on later systems.
- Frame size, key frames and frame rate to be consider when using Expert
Settings
- Remember that frame size is directly related to file size.
- Key frames control quality and file size. The higher the number of frames
the better the quality of the movie and the larger the file size. A lower
the number of key frames results in a lower quality movie with a smaller
file size.
- Frame rate controls how choppy your movie playback will be. It should
never be lower than twelve frames per second. Again, the higher the frame
rate the larger the file.
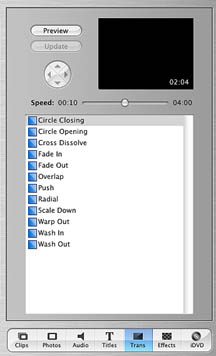
Transitions
Transitions are defined as the effects used
to move the viewer from one clip to the next. It is important to remember that
if relatively long transitions are used sufficient footage must be available.
In instances when it is necessary to have a screen become black a black segment
must be created in the timeline and this can be done by either dragging existing
clips aside creating a "hole" or by inserting a black graphic. The
palette appears when the Transitions Button in the menu bar at the bottom of
the shelf is clicked. The palette shows the available transition styles, a preview
window, an update button, a four directional arrow icon, and a button for controlling
the speed and direction of the transition. Clicking on the preview button permits
the viewing of a full-size preview in the Monitor window. The update button
makes the transition part of the movie. The four directional icon is grayed
out except when a certain transition that require it is selected.
The standard transitions include:
- Cross Dissolve
- is used to emphasize continuity between clips so as Clip A fades out Clip
B fades in which means that both clips would be played at the same time. A
fast transition would use for example fifteen frames (a half a second) while
a slow transition would use 120 frames (four seconds).
- Fade-In
- is used to emphasize the beginning and causes a clip to fade in from a black
background.
- Fade-Out
- is used to emphasize the end and causes a clip to fade to a black background.
- Overlap
- is used when you want the viewer to compare to images, and emphasize continuity.
It is similar to Cross Dissolve, but this time both Clip A and B are shown
together before Clip A fades out and clip B starts.
- Push
- is used to emphasize a break between scenes and causes Clip A to slide off
the screen as Clip B slide sin to replace it. The direction that a clip slides
is controlled by using the four directional icon. It can be used with still
images to simulate smooth panning from left to right .
- Scale Down
- is used to emphasize a break between screens and causes Clip A to shrink
and disappear as Clip B appears as a background image.
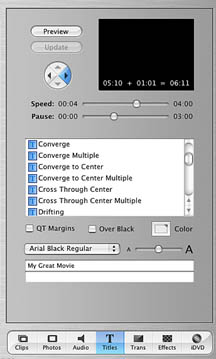
Titles
The layout and functionality of the Titles palette is similar to that of the
Transitions palette.
- The preview window instantly displays the contents of the text fields (located
near the bottom of the palette) which permits an assessment of title effectiveness.
The preview is activated by selecting a new style or adjusting the Speed and
Pause sliders. Remember that clicking on the Preview button will allow you
to view a full size version of the title sequence in the Monitor.
- The Speed and Pause sliders determine respectively, the speed of the animated
title and the length of the pauses. Note: a higher speed number means that
a slower displaying title has been selected. A the bottom of the preview window
are numbers which show the calculations that indicate the total duration of
the title sequence based on selected settings for speed and pause.
- The scrolling list of styles includes "Bounce to Center", "Drifting",
"Flying Letters", and Flying Words".
- The Color Box permits the selection of a particular
color for the text.
- The Over Black determines whether the title
is superimposed over an existing video clip or over a black background.
- QT Margins refers to the edges of the screen
that QuickTime Movies will display but television will cut off. This option
should only be selected if the movie will be QuickTime format and deselected
if the movie is to be shown on television.
- The pull-down font-selection menu and font-size slider allow use of other
fonts and various sizes besides the default "Times".
- In certain instances more fields can be added or deleted by using the +
and -. Also fields can be rearranged by dragging and dropping.
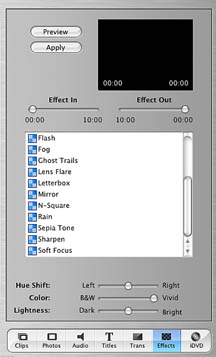
Effects
Allows the application of special effects to
the video and the palette format is similar to the Transitions and Titles palettes
containing a preview window, a scrollable list of effects and adjustment sliders.
The preview window shows the possible result based on the selected special effect.
The Preview Button permits a full sized preview in the Monitor window. The Effect
In permits the adjustment of how fast the effect slides in. A setting of 00.00
has the effect start with the first frame. The Effect Out slider permits that
determination of how close to the end of the clip the effect starts to fade
out. The selected effect is not implemented until the Apply Button is pressed.
Some of the effects include:
- Adjust Colors - brings up three control sliders that adjust hue, color and
lightness.
- Black and White - conversion to black and white
- Brightness/Contrast - used to improve clips that are too dark or too light
or have too much or too little contrast.
- Sepia Tones - used to create sense of a yellowed archival photographs, to
suggest age or to match new footage with historical photographs or drawings.
- Sharpen - used to improve the quality of a clip that appears to be out of
focus. If used too much it can cause a grainy appearance to the clip.
- Soft Focus - used to cause a bit of blurring of the clip.
- Water Ripple - used to create the illusion that the clip was shot through
water.
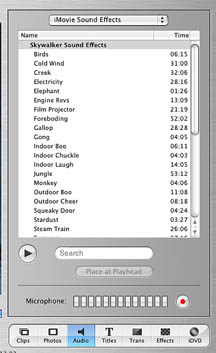
Audio
This palette permits the importing and recording of sound and the ability to
add sound effects to a movie clip. Audio files of the form MP3 and AIFF are
supported. The iTunes library can also be used as a source for background music
but be advised that we must be aware of the copyright laws. Note: audio files
are imported to a track in the timeline viewer and not onto the shelf. Audio
tracks can be arranged on the audio timelines by either dragging and dropping
the tracks at the appropriate location. A the second procedure is to use the
playhead. Position the playhead at the appropriate location and select Place
at Playhead. Using Advanced permits
the locking of a track to a particular part of the video so that the audio track
moves with the video track.
A select number of Sound Effects are included on the Audio palette and these
can be inserted anywhere in the movie. The sound effect is inserted by dragging
and dropping the effect at a particular location. Sound effects can be dragged
to a new location.
Voice narration can be included by moving the playhead to the desired location
using the Sound and Record Buttons. Optimum levels should be between 50 % and
75%.
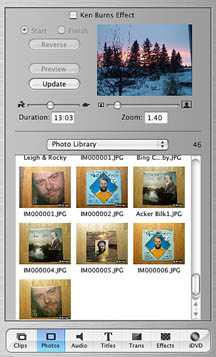
Importing Photos
Photos can be imported into a movie or a movie can be created using just photos.
This palette allows the selection of the album containing the required photos.
Once all the photos have been selected, the duration and the zoom factor can
be changed using the appropriate slider. In addition the Ken Burns effect can
be applied to the photos. Selecting the Update
buttons makes the selected changes to one or all pictures and places them of
the timeline.