Moving Along a Path
(adapted from Flash 5 by Bill Sanders and used with his
permission)
Objectives:
- to use Motion tween options to set an object's initial path
- to use a Guide layer to create a path
- to draw an object using the Line Tool
Basics:
- modification of objects can only occur on keyframes
- objects are stored in the Library
- identification of the location of the necessary keyframes
- objects change position over time
- objects can be resized
- when a bug moves it does not necessarily follow a straight path but it does
orient itself to the direction it is moving
- Definition: A Motion Guide defines a path for a linked, tweened graphic
to follow. A motion-guide layer can control items on several layers as long
as the layers are linked to it. Linked layers are referred to as guided layers
in the e Properties Panel.
Exercise:

Layers:
- Create two layers and use the following labels for the layers: background
and ladybug
- Click on Frame 30 and select this frame for each of the layers by holding
down the shift key and then insert frames for all the layers (Insert
Menu/Frame or shortcut F5).
Creation of the Background Layer (See Figure One)
- Click on the Fill Color Well and choose
a light color from the color palette. Repeat this procedure for
Stroke Color Well.
- Select the Rectangle Tool from the
Toolbox and draw a rectangle that covers the entire stage.
- Lock this layer.
Drawing of the Ladybug
- The drawing of a ladybug will involve the use of two colors: black
for the outline, spots, legs and antennae and red for the fill
- The Line Tool will be used for
the drawing and the drawing will be done in the Ladybug layer.
- To assist in the drawing of the ladybug it is suggested that you increase
the magnification to 200 or maybe even 400
- With the drawing complete use the Info Panel and set the dimensions
of the ladybug at H = 60 and W = 40
- Select the Insert Menu and then
select the Convert to Symbol (shortcut
is pressing the F8 key). When the Symbol
Properties Dialog Box opens
click on the button beside Graphic
in the behaviors column. Use the name Ladybug for the symbol name and
click OK. An instance of the symbol Ladybug has been created.
|
|
Adding a Motion Guide Layer
- In the first frame position the Ladybug in the upper left hand corner of
the stage.
- In the last frame position the Ladybug in the lower right hand corner of
the stage.
- Create a motion tween of your ladybug.
- Check the Orient to Path box which will
cause the ladybug to turn to the curve of the path and check the
Snap box which causes the object to snap lock to the path.

- Select the layer of the tweened graphic

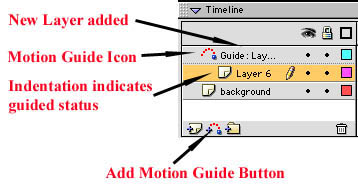
- At the bottom of the timeline (lower left hand corner) click on the Add
Motion Guide Icon. Flash will add the Motion
Guide layer directly above the layer you have selected and give
it a default name of Guide:Ladybug. A Motion Guide
Icon will appear to the left of the name and Flash will also indent
the layer linked to the Motion Guide.
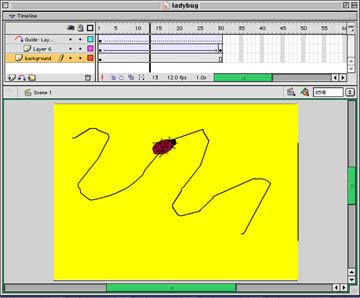
- Select the Motion Guide layer and use
the Pencil Tool to draw a line on the
stage that you want the graphic to follow. This line will not be visible when
you view the movie.
- Lock the Motion Guide layer
- Select frame 1 and drag the ladybug to reposition its center point (the
small white circle inside the graphic) directly over the beginning of the
path (You will be able to see the path inside the circle).
- Select frame 30 and reposition the ladybug directly over the end of the
path. Flash will draw the inbetween frames.
- Test the movie
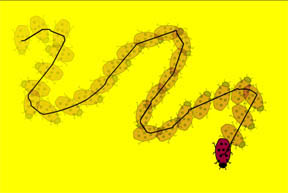
- To use the onion skin:
- move the play head to the last frame
- select the moving object to wish to show
- click on the Onion Skin
- select the Modify Onion Markers
drop down menu (fourth Onion Skin Icon) and choose Onion
All
- See the diagram below for an example of what the
Onion Skin would look like.

Ladybug Movie
