Animating Text Blocks
(adapted from Flash 5 by Bill Sanders and used with his
permission)
Objectives:
- to use text blocks to create animation
- to define and save color swatches
- to utilize the Rotation Command from the Transform Panel found in the Modify
Menu.
Basics:
- text blocks are objects in Flash
- the Info and Transform Panels can be used to make changes to the text block
- the free transform Tool found in the Toolbox can be used to manipulate the
text block.
- rotated, skewed, scaled and repositioned text blocks go through all the
stages of the tweening motion.
- changes to font, color and alpha (transparency) do not go through the stages
of the tweening motion
- the Free Transform Tool can be used to change the orientation of the object.
Remember that when the cursor is moved near the corner block a circle will
appear allowing the object to be rotated.
- the color of the stage can be changed by selecting the Black arrow in the
Toolbox and then clicking on the color pop-up menu of the background in the
Properties Panel
- when objects are grouped they can be moved, scaled, rotated and skewed and
are not altered when objects are drawn over top of them
Story Line:
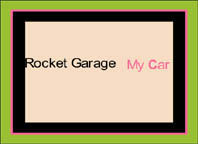
- a car (My Car) will be moving forward and suddenly flip over
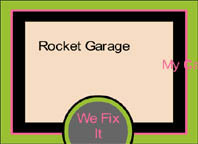
- a tow truck (Rocket Garage) will arrive and pull the car upright
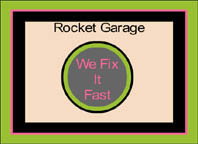
- the car will drive off and the tow truck will return to the garage as an
advertising sign appears
Exercise:
a) Layers
- four layers will be used in this movie and labeled as indicated

- the movie will be 70 frames in length
- the color scheme for this project will be: a pale yellow - #F5DCC2,
a green - #99C033, a pink - #FF6699, a gray - #666666 and black
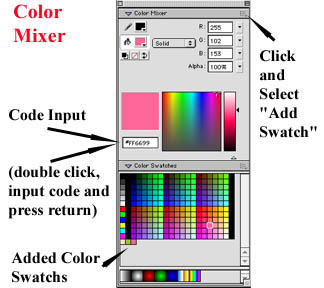
- to create each swatch proceed as follows:
- open the Color Mixer panel
- double click on the Code Input Box and enter the indicated code
and press return
- click on the Mixer panel's drop-down palette found in the upper
right hand corner and select "Add Swatch"
- for the color black click on the black swatch found in the Color
Swatches and select "Add Swatch" from the drop-down menu.
- all the color for this project will be grouped together and will
be located at the bottom of the swatch window.
- keyframes and motion tweens will be added at various points in each
layer as indicated in the diagram below.
|
 |

b) The Background Layer
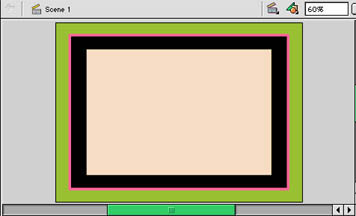
- select the green color for the background color of the stage
- select the Rectangle Tool
- in the Properties Panel select a 6-point
stroke, pink for the Stroke Color Well
and black for the Fill Color Well
- draw a rectangle covering most of the stage.
- click on the Black arrow and then
select the rectangle that has been drawn
- select the Group command from
the Modify Menu or use Command
G and group the stroke and fill elements
- select the Align Tool from the
Modify Menu and center the rectangle
both vertically and horizontally
- draw a rectangle with a Fill Color Well of pale yellow and no stroke
fill covering most of the black portion of the stage.
- click on the Black arrow and then
select the rectangle that has been drawn
- select the Group command from
the Modify Menu or use Command
G and group the stroke and fill elements
- select the Align Tool from the
Modify Menu and center the rectangle
both vertically and horizontally
|
|
- lock the background layer
c) My Car (use diagrams below to help with arrangement)
- select the Text Tool in the Tool
Box and set the Font to Arial at 36 point using the pop-up slider
and the color pink selected from the designed swatches in the pop-up color
panel
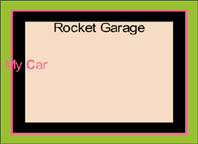
- type in "My Car" and position the text block on the left side
of the light colored portion of the stage with a Y = 179 with the word Car
just appearing on the stage
- select frame 20 and insert a keyframe
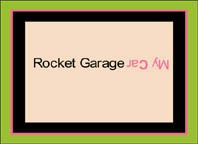
- drag the text across the stage and using the Scale
and Rotate command found in the Transform
Panel/Modify Menu rotate the text block 180 degrees.
- position the text block so that the word My is just in from the right hand
side of the light colored portion of the stage and Y = 179.
- double click on frame one and insert a Motion
tween
- select the text block and click on frame 30 and insert a keyframe
- with the text block selected click on frame 45 and insert a keyframe
- use the Scale and Rotate command and
rotate the text block 180 degrees.
- double click on frame 30 and insert a Motion
tween
- click on frame 70 and insert a keyframe
- select the text block and drag it completely off the stage keeping Y = 179
- double click on frame 45 and insert a Motion
tween
- test this part by moving the playhead back and forth
- lock this layer

Frame 1
|

Frame 20
|

Frame 30
|

Frame 45
|

Frame 70
|
d) The Fix It Layer (use diagrams above to help
with arrangement)
- click on frame one and using the Text Tool
with a font of Arial, at 36-point, Bold and color black create the text block
"Rocket Garage"
- position the text block near the top of the light colored portion of the
stage
- select the Align Panel in the Modify
Menu and use the Center Vertical
command to center the text block
- check the X and Y values in the Info Panel
as these vales will be required later.
- select frame 20 and insert a keyframe
- click on frame 30 and insert a keyframe and drag the text block so that
it is to the left of the inverted text "My Car". and at Y = 179
- double click on frame 20 and insert a Motion
tween
- check this animation in relation to the animation of My Car by moving the
playhead back and forth
- select the text and click on frame 45 and insert a keyframe
- while the text block and frame 45 are selected press down the
Shift Key and press the Left Arrow Key
twice (moves the text block 18 pixels to the left)
- double click on frame 30 and insert a Motion
tween
- select frame 70 and insert a keyframe
- select the text block and return it to its original position using the previous
information about the X and Y values from the Info
Panel
- double click on frame 45 and insert a Motion
tween
- lock this layer
e) The Fast Fixer Layer (use diagrams above to
help with arrangement)
- select frame 45 and insert a keyframe
- select the Oval Tool and in its Properties
Panel set the stroke to 6-point and the Stroke Color Well to black
and the Fill Color Well to green
- draw a circle of W = 195 and H = 195 below the stage
- click on the center portion of the circle to select the fill portion of
the circle
- use Command C to make a copy and from
the Edit Menu select Paste in Place
- open the Transform Panel in the Windows
Menu and type in a percentage of 85 and press Return
- select the gray swatch in the Fill Color Well
and none in the Fill Color Well
- click on the Black arrow and select
all the circles and use Command G to group
the different elements of the circle
- select the Align Panel in the Modify
Menu and use the Center Vertical
command to center the grouped circles
- select the Text Tool and in its Properties
Panel select the Arial font, 24-point, Bold and the pink swatch
- type the message "We Fix It Fast" in the middle of the circle.
Check the word orientation in the above diagrams
- select the text block and circle using the Black
arrow in the Toolbox and use Command
G to group these elements.
- select the grouped object and click on frame 70 and insert a keyframe
- drag the object to the middle of the stage and use the Align
Panel in the Modify Menu to
center both vertically and horizontally
- double click on frame 45 and insert a Motion
tween
- click on frame 70 and open the Actions Panel
in the Windows Menu
- double click on "stop" in the Movie Control
part of the Action Panel
- lock the layer
- test the movie
Text Block Movie

