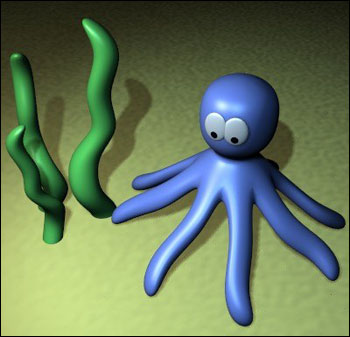
The Octopus

(http://biorust.com/)

This tutorial will teach you how to make a little octopus, using the "subsurf" functionality of Blender, which allows you to create smooth/organic shapes rather easily. If you don't know the subsurf function, the first part of the tutorial may seems a little strange, because you're going to create a shape full of angles that ends up looking like an abstract modern sculpture - instead of a smooth octopus. But then the magic of subsurf will take effect.  This tutorial will also show you how to assign 2 materials to an object.

Getting Started

Step 1 - First, on the top view ("7") add a circle (space bar > add > mesh > circle) . Choose 8 vertices.


Step 2 - On the front view ("1"), with all the points selected, press the "E" key, and click on Extrude. Then move your cursor up to move the new points as shown on the image #1. This part is going to be the "body" of the octopus (although at the moment  it doesn't look like it). Press the "E" key a second time and move the points as shown on the image #2. Now, resize ("S") the last part as in image #3.  

Step 3 - Go back to the top view ("7"), and select (A/B) the points displayed in yellow in image #1. Then extrude ("E") them as in #2. Extrude them some more to get something resembling image #3. This strange shape is an octopus tentacle!


Step 4 - Repeat the same process as in step 3, but with all the pairs of points, so you'll get something looking like the image opposite. It starts to look like an octopus, but a very abstract one.


Step 5 - Select (B) all the points in the middle, and go to the front view (1)


Step 6 - Press the "O" key (the letter "o", not "zero"). You should now see a new icon on the header. If you click on it, you'll see a menu with the choice between Smooth or Sharp Falloff. The "falloff" is the way the points that are not selected will follow the movement/size of the points that are selected, depending on their distance to them. I don't think I need to explain the difference between the sharp and smooth falloffs, the little icons are self explanatory.


Step 7 - Press the "G" key, but don't move the cursor. You should see a small grey circle near the selected points. This circle tells you how far the falloff influence goes. Press the "+" key to increase its size, until the whole octopus is within the circle. Then, move the selected points as shown on the image. You can press the "O" key again to disable the falloff mode.


Step 8 - We will now make the head of the octopus. Select ("B") all the points at the top of the shape, and extrude them a little ("E").


Step 9 - Extrude them twice more, and resize ("S") the last extrusion to make it smaller.


Step 10 - Extrude the points a last time, and then resize them to make it look as if they are only a single point. Then, on the editing menu, on the Mesh Tools box, increase the "Limit" a little and click on "Rem Double". This will remove the points that are almost at the same place, and keep only one single point at the top of the octopus head. ("Limit" specifies the maximum distance where the points/vertices would be considered a double).


Step 11 - Using subsurf is very simple: just click on the "SubSurf" button in the "Mesh" box of the edition menu ("F9"). As you can see, a rounded shape appears inside our mesh.
On the latest versions of blender, there are 2 different algorithms to create this subsurf (subdivision surface), "simple subdivision" or "Catmull-Clark". I think the "Catmull" one is better, so keep it selected. You can also specify the level of subdivision displayed on the 3D view (and in "Real-time", but there's no real time engine in the Blender versions between 2.26 and 2.32) and in the render. The higher this level is, the better the result will be, but the more time it will take to render.  I think a level of 2 or 3 is high enough for our octopus.


Step 12 - Now all we have to do is press the "Set Smooth" button (still on the edition menu, in the "Link and Materials" box). Then enable the shading with the "Z" key to see what it looks like.


Note: If some of your tentacles look weird, this might be because you extruded some part of it without moving the points created by the extrusion, and then extruded over again. This causes some points to be superposed. To remove them, select all ("A") the points, and press the "remove double" button, as in step 10).

Step 13 - In the Shading menu ("F5"), click on "New Material", and define a color for your octopus. This is not supposed to be a realistic octopus, so I made mine a light-blue. Now the octopus is almost complete, but it lacks eyes.
Note: If you're tired - or if you don't want to add eyes to your octopus - you can stop following this tutorial here.


Step 14 - Switch to the object mode (Tab). On the top view ("1"), and on the same/new layer (as you wish) add a sphere ( Add > Mesh > UVsphere). 20 segments and 20 rings should be just fine.

We're going to add 2 materials to this sphere to make one eye. Go to the Editing menu ("F9") and click twice on "New" to create 2 materials for this single sphere. Then, go to the material menu (F5) and click on the "2" that is displayed on the right of the material name. Then click on "Single User" to validate.


Step 15 - Go back to the Editing menu, and (with all the points of the sphere selected) click on "Assign" (below the "New" button). This will assign the selected material ( material #2 of "Material.001" in my example) to the whole sphere. Then deselect all the points ("A") and use the selection circle ("B-B") to select the points in the middle of the sphere, as shown in the image below. On the Editing menu, click the left arrow of "2 Mat: 2" to select the other material we created (It should now display "2 Mat: 1" ), and click once again on "Assign".


Step 16 - Go to the material menu ("F5"). Under the material name you should have "2 Mat 1" written. This means we're on the material #1 out of 2. And #1 is the centre of the eye, so choose a dark color for it. Click on the arrow on the right of "2 Mat 1" to get the material #2 (the white around the eye) and make it white (pretty obvious, eh?). If you press the "Z" key, you should now see a kind of weird eyeball in front of you. 


Step 17 - Go to the side view (numpad 3), select all the points of the sphere. Press Ctrl+S to "twist" the sphere as shown on image 1. Then, press "S" once again, and click with the middle button (or press Alt and then Z) to restrain the change on size to the Z axis, and make it look as on image 2. Now if you go back to the top view, you'll see we have one funny eye. Make it smooth (editing menu("F9") and "Set Smooth").


Step 18 - In object mode (Tab), copy the eye (shift+D) and put the second eye just beside it. Now you only have to put that great pair of eyes onto the octopus "face". I won't detail this step, because you should already be competent with the size("S"), move("G") and rotation("R") tools. 


Step 19 - Add a background, a few "sea objects" (shingles, seaweeds, etc.) and you're finished !

Note: I made the seaweeds using the same extrusion & subsurf process as the tentacles.