A 32-sided mesh circle.
The first extrusion step
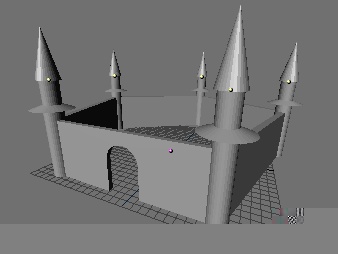
The Castle
by Bart Veldhuizen (http://www.blender3d.org/_media/education/quickstart/Building_Castle.html)
Building a Castle
Introduction
This tutorial will introduce you to basic modeling techniques in Blender. It assumes some basic knowledge like adding objects, using edit mode and changing the view.
The castle is used as a starting point for other tutorials on this site like Texturing a Castle.
Remember to save your work early and often! This is a good computing practice which you should follow anyway but is even more important in Blender. If anywhere along the way you find that your castle doesn't look quite right you can press Control + "Z" and your model will revert back to the state it was in before you entered edit mode. This is Blender's version of and 'Undo' button.
Creating the Tower
1. The tower is created by simply extruding a mesh circle several times. By using both translation and scaling while extruding you can create a nice outline.
Let's start by switching into top view (Num Pad 7). Remember that the each number on your keypad will switch you into a different view. Let's begin creating the top of our tower. Add a mesh circle which can easily be done by pressing the space bar, click "Mesh" and then click on "Circle." Leave the number of vertices on 32 (the default).
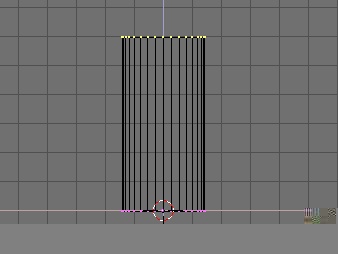
A 32-sided mesh circle. |
The first extrusion step |
2. Make sure that you're in edit mode before proceeding. If you're in edit mode you'll be able to see the individual vertices of the circle. You'll recall that vertices are the points that define the shape of a 3D object and appear in Blender as small dots. Your screen should look like the picture above at this point. If your circle just looks like a pink outline this means that you aren't in edit mode and should press the TAB key.
3. Switch to front view (Numpad 1) and press "E". Confirm the requester that pops up to start the extrusion. Confirm the extrusion. ![]()
To confirm any requester in Blender, either click on the text (in this case, 'Extrude') or press ENTER. To cancel, either move your mouse cursor away from the requester or press ESC.
4. After you start an extrusion, grab mode is automatically started. Hold down CRTL to constrain the movement to grid units. This will make your cursor snap to the grid lines in the 3D window making it easier to keep your tower from leaning to one side. Move your mouse upwards a bit and left click. This part will form the cone on the top of the tower. As you can see extruding an object creates a clone of the vertices which you have selected and allows you to extend the body of your object. If you had not been in edit mode during this step you would've been unable to extrude your circle.To taper the top, press "S" to start scaling and hold down CRTL again. Move your mouse horizontally to scale and left-click once, the top has been scaled down to zero (this is shown in the bottom left corner of your 3D window).
5. Now work from the bottom of the cone and extrude the rest of the tower out of it - this uses the same technique as the previous step. First, press "R" to deselect all vertices (pressing it again will select all the vertices). Select the vertices on the bottom of the cone by starting Box Select (B) and dragging a rectangle around them.
Tapering the top. |
Some extrusion steps. |
Press "B" twice to use Brush select - in this mode, a circle appears. Use this circle to 'draw over' the vertices and select them. Press numpad "+" and numpad "-" to change the brush size.
6. Now we're going to create the body of our tower. For the first step, start the extrusion ( "E " key) and then immediately press the "S" key
. Scale the inside of the tower down a bit. When you're satisfied with the width of the body of your tower do a left click to set the size. Next, do a 'normal' extrude and drag the selection down.
Don't forget you can use the Shift key to help keep your tower standing straight and tall. Left click when you're happy with the height of your tower to lock it's size in place.
If you like, you can add some more detail like I have done here. Your tower is ready!
A tower. 
The Castle Wall
1. We are goingt to create a pentagonal castle wall. To be able to place the towers on the right positions use another mesh circle. Later on, I turn this circle into the castle wall.
2. Leave edit mode (TAB), return to top view (NumPad 7) and add a mesh circle with 5 sides. Scale it to the right proportions. By leaving Edit Mode and then creating our walls (a 5 sided circle in this case) we're telling Blender to think of our circle as a seperate object from the tower. This will make editing our castle wall a lot easier later on.
5-sided circle. |
Placing the Tower. |
Leave edit mode and select the tower with Right-Mouse.(CRTL Click). 'Grab' your tower ( "G") and move it to one of the corners of the pentagon. Don't put the center of the tower exactly over the corner of the pentagon, but rather slightly more outward - this is to take the thickness of the wall into account (see above).
3. With the tower selected, press SHIFT D to create a duplicate. Grab mode is now automatically started, so you can move the new tower to another corner. Repeat this for all corners.
Creating copies of the tower. |
Giving the wall body. |
Pressing SHIFT D will make a full copy of the entire object - geometry included. After this, you can edit the geometry of every individual copy without affecting the others.
If you use ALT D however, Blender will create an instanced copy. In this case, each copy's geometry is linked to the original data. Changing one individual copy will change every copy along with it. Using instanced copies requires less memory than full copies.
5. Now to give the castle wall some body, select the circle and enter edit mode. Select all vertices and start extrusion. Scale the selection a bit to give the circle some width. The wall has width now, but no height. Leave edit mode and switch to front view with numpad "1". Your wall now probably starts somewhere in the middle of your tower, so use grab mode to move it to floor level. While still in front view, extrude the wall upward.
Giving the wall height. |
Giving the wall height. |
The result so far!

This is already starting to look like a castle, isn't it?
Creating the Castle Door
1. To add a door in the wall simple mesh editing will be utilized. The segment of the wall that I want to work on (the bottom part) is slightly rotated, so I will first make it horizontal. Select all the objects in your scene with "R" and rotate your entire scene until the bottom segment is horizontal. Hold down CRTL to constrain the rotation to multiples of 5 degrees.
Rotating the scene |
Selecting the bottom wall. |
2. Now separate the segment of the wall from the rest so that you can work on it. Select the wall and enter edit mode. Use Box Select to select the bottom segment of the wall as shown. To create a new object out of the selected vertices, press "P" and confirm the requester. If you now leave edit mode, you will have a new, separate object. Select the new object. Creating a new object out of the selection. |
Creating a new object out of the selection. |
3. Now to make life a little easier on myself, it is a good idea to move this new object into a separate layer. Doing this will allow me to hide the other objects. With the new object selected, select the OBJECT button to bring up the Move Layer requester. Select the second button or press "2" to move the wall segment to layer 2. Press ENTER or press OK when done.
|
Moving the wall segment to another layer. |
In the bottom of your 3D window, you see a similar row of buttons. It currently has only layer one selected, so moving the wall segment to layer 2 will make it disappear. Shift-click on button two or press SHIFT 2 to activate layer 2 as well.
It's a good idea to utilize layers for anything more than a fairly simple project. This will allow you to break down your project into more manageable and flexible chunks. It will also enable you to make changes far more easily than if you had everything on one jumbled, complicated layer.
4. For now, I only want to see the wall segment so press "2".
Removing vertices. |
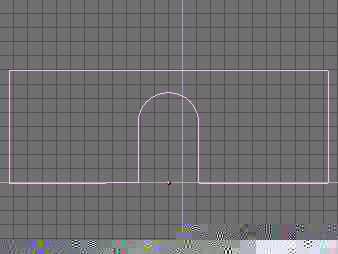
5. First I will create a flat image of a wall with a door in it - later I can extrude this to get a wall with a hole in it. First I need to remove half of the vertices. Enter edit mode and select the top vertices using Box Select. Press "X" to bring up the Erase requester. Select 'Vertices'. (Figure 1)
|
Showing only the wall segment. (Figure 1) |
Placing the 3D cursor. (Figure 2) |
6. Switch to front view, enter edit mode (!) and add a 32 segment mesh circle. This will become the top of the door. Move and scale it a bit so that it has the right size and position. (Figure 3)
Now press "R" to deselect all vertices and select only the bottom half using Box Select. Press "X" and select 'Vertices' when the Erase requester pops up to delete the bottom half of the circle. (Figure 4)
Adding a circle to the door. (Figure 3) |
Deleting half of the circle. (Figure 4) |
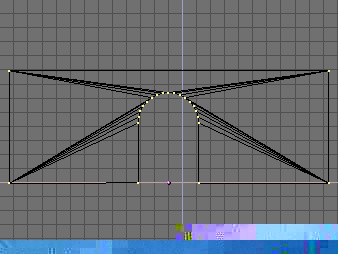
7. Select the two lowest vertices and extrude them downwards so that they match the bottom edge of the castle wall. (Figure 5) Now I need to attach the door to the rest of the wall. First, I need to remove the original edge at the bottom of the wall. Select the two vertices at the bottom left and bottom right corners of the wall as pictured in Figure 6.
Extruding the circle to form a door. (Figure 5) |
Preparing to remove the bottom edge. (Figure 6) |
8. Press "X" and select 'Edges' to remove the bottom edge. (Figure 7) Connect the corners of the wall to the corners of the door by selecting two vertices and pressing "F". If you leave edit mode now, your model will look like this: (Figure 8)
The bottom edge removed. (Figure 7) |
Reconnecting the outline. (Figure 8) |
9. The outline is now all right, but the shaped is not filled. You will notice this when you switch to shaded view with "Z". To fix this, enter edit mode and select all vertices. Press SHIFT F to fill the shape.
10. As the last step I will give the wall depth again. Switch to top view and extrude the wall slightly upwards. Try to match the depth of the other wall segments. If you are not sure about the depth, press SHIFT 1 to turn on layer one.
Filling the wall. |
Extruding the wall and door. |
11. When you are done, leave edit mode, activate layer 1 (SHIFT 1) and turn on solid view with "Z". I also turned to perspective view (Numpad 5) and rotated the view a bit.
The next step is to apply some nice materials to your model. This is explained in detail in Texturing a Castle.
Texturing a castle
Introduction
No matter how well you can model, you will need to add good materials and textures to your model to make it look realistic. In this tutorial you will learn how Blender works with materials. You will notice that I added some details like a drawbridge and a moat. All of these were made with the same techniques as described in Building a Castle. It also contains two lamps and a camera. |
 |
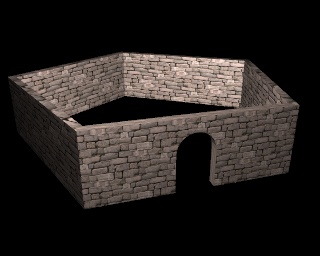
The castle before applying materials. |
Showing only the drawbridge in layer 5. |
To make things a little easier for you, I have moved the objects in my file to different layers. This allows you to display only relevant objects by the push of a button.
1 - Moat
2 - Floor
3 - 1 Tower (the rest is in layer 9)
4 - Front wall
5 - Door, drawbridge and chains
6 - Inside square
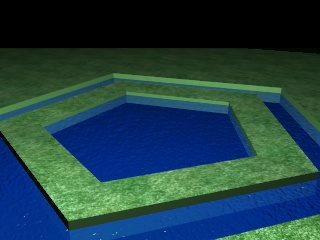
7 - Water
8 - Other walls
9 - Other towers
To display a layer, press the associated number on your keyboard. To show all layers at the same time, press the ~ key. As you can see, the light and camera are present in all layers so you can always render your objects.
Creating a new Material
![]() Switching to the Material Buttons screen.
Switching to the Material Buttons screen.
1. Let's start off by creating a simple material without textures. Select the moat object in layer one by pressing " 1" and select the object. To start working with materials, go to the Material Buttons screen. You can reach this by selecting the icon of the red ball in the header of the lowest window, or by pressing "F5". Later on I will add a transparent water surface layer on top of this.
![]() The material data block button.
The material data block button.
2. Right now, there is no material associated with the object so nothing is shown in the Material Buttons window. The first thing I need to do is add a new material. Take another look at the header of the Material Buttons window and press the button with the '-' sign on it.
| 3. A requester will pop up, asking you if you want to select an existing material or create a new one. In this case, select 'Add New'. |
Selecting an existing material or creating a new one. |
4. Let's take a closer look some of the buttons in the window that appears now. On the far left is the material preview. Any changes that you make to your new material are immediately shown here. The default view is flat but if you prefer a sphere, just press the icon of the red ball.
The material preview |
5. The next group of buttons determines the material color. Try changing the values of the R, G and B sliders now to create a nice deep blue color for your moat. The changes will be visible in the 'Color' section of this window in real-time. If you stop dragging a slider, the material preview will render with your selected color. I used R=0.1, G=0.3 and B=0.6 for my material.
Colors Material properties buttons affect material properties such as shininess, hardness and transparency. Try changing them and seeing how they affect the look of the material preview (this works best of you view it as a sphere instead of a flat plane). I changed the Spec value to 1 and Hard to 75 to get a nice plastic. |
6. When you are satisfied with your new material you need to give it another name. This makes it easier if you want to apply it to another object later. Left-click in the material name space (it probably says 'MA:Material') and type in a new name. Press ENTER when done.
Changing the material name |
Blue! |
Manipulated castle wall picture |
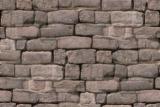
7. I could go on adding materials like this, but the scene would start to look like everything was made out of plastic. To add some realism I will now apply an image as a texture map. For this, I have prepared a picture of a castle wall. You will see that I have manipulated it a bit to prevent the edges of the picture from showing up. If you are familiar with the Gimp (a free image manipulation program), you can do this with the feature 'make seamless'. Preparing your images before you apply them as a texture map is often a good idea. |
8. Switch to layer 4 and select the front wall. Create a new material for it. Now take a look at the right part of the Material Buttons screen. There is a row of 8 buttons.
![]() The 8 texture channels.
The 8 texture channels.
Each one can hold a texture that you can apply to a material. Click on the first button and add a new texture by selecting the '-' button below the texture buttons. This button works in the same way as when creating a new material.
![]() The Material data button
The Material data button
Like with the material, you can give each texture a name by left-clicking in the name field. If you want to remove a material, select the 'Clear' button.
![]() Switching to the Texture Buttons screen.
Switching to the Texture Buttons screen.
To change the texture settings, switch to the Texture Buttons screen. Select the texture icon or press .
Preparing to load a picture.
|
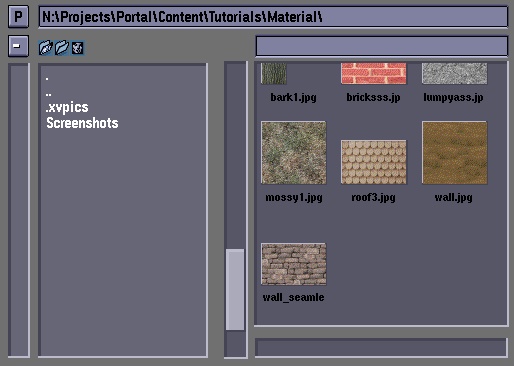
9. For now, it is best to ignore all the buttons in this screen except for one: 'Load Image'. Select it to bring up the Select Image window |
| This window works like any other file window in Blender, except for the fact that it shows thumbnail previews of each image in the current directory. If you have many images, it can take a while for the screen to update. To load your image, select it by left-clicking on it and pressing ENTER. Alternatively, you can also middle-click on it to immediately load it. |
Selecting a texture map |
Determining the mapping method. |
Changing the mapping size. |
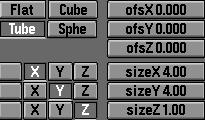
10. Return to the Material Buttons screen and take a look at the mapping method buttons. These determine how the texture is applied to your object. The most basic one is 'Flat'; this works like a slide projector. If you are not careful with this one it can severely distort your image.
The second option, 'Cube', projects your map on all sides of your object. In many cases, this works quite well without further tweaking.
'Tube' and 'Sphere' are, you guessed it, for mapping your object onto tubes and spherical objects.
For the wall, select Cube mapping.
If you do a test render now ("F12"), you will see that the bricks are still quite large in comparison to the wall. This is where the Size buttons come in handy: tweak these to change the size of your bricks. You can squeeze your image by scaling your texture map differently in the X or Y direction. I found that SizeX=3 and SizeY=1.5 gave good results. Your mileage may vary though if you are using your own wall with a different size.
The wall with a brick map |
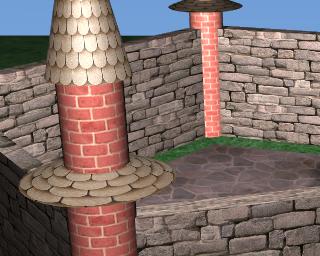
The Roof Tiles |
So far, so good. Now on for the rest of the walls. Press SHIFT 8 to turn on the other walls ( SHIFT will keep layer 4 selected as well) and select the other walls. Use the material selection button ('-') to apply the wall material to this object too. A test render should look look like a real wall now!
Mapping the tower
Mapping the tower is very similar to the wall, only this time I will use a different mapping method. Because of the circular geometry of the tower, it makes no sense to use cube mapping for it. Instead, I will use cylindrical mapping ('Tube') for it. The the rest, the tweaking is the same as above.
1. The tower consists of two separate objects so start by creating two new materials for it (Roof and Wall). Load the provided textures into them.
If you are using a tower that you modeled yourself, you will need to split the roof from the rest of the tower. To do this, enter editmode and box select the vertices that you want to separate from the rest of the object. Press "P" to separate them.
This is the texture that I used for the wall of the tower.
Setting the tower mapping parameters. |
The Tower Wall |
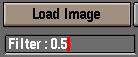 |
2. Again, you will need to tweak the size of the applied texture map before it looks all right. I had to create a second material for the roof halfway down the tower and tweak it's size settings a bit before it looked ok. I found that my brick texture looked a little bit too fuzzy. This was caused by the way Blender handles texture maps - each texture map is filtered before it is applied to an object. In this case, the filtering was a bit too much. Fortunately, you can change the amount of filtering that is applied. Go to the Texture Buttons screen and decrease the 'Filter' value.
3. Blender can remember two versions of rendered images. You can flip between them with "J". If you want to see the result of the new filter value, render an image with the old setting first. Then press "J" and render a new image with the new setting. Pressing "J" will now flip back and forth between the old and the new image.
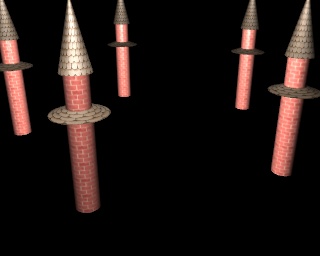
This is a quick test render of the mapped towers.
The remaining materials
The remaining materials all use the techniques that I have described above. Just load the images provided and try if you can figure it out on your own.
Portal Texture |
Bridge Texture |
Courtyard Texture |
Grass Texture |
1. For the portal you will need to create three materials: one for the door itself, one for the wooden bridge and one for the metal chains. For the door, I have selected a sandstone-like texture. Apply it to the portal outline with a low specularity and a low hardness.
Apply this wood texture to the bridge. Like with the portal, create a dull looking surface for this.
2. The metal chains are relatively small and do not really need a texture map; the detail would probably be lost anyway. However, to make a material metallic there is a nice trick that you should know: when you look at the real-time color preview you will notice there is also a color preview which is labeled 'Spec'. This is the specular or highlight color of the material. If you select the 'Spec' button, you can change this color.
3. For plastics, the specular color is white. For metals it is usually different from the material's normal color. To create realistic chains, try setting the material color to black and the specular color to blue.
4. This is the texture map for the courtyard inside the castle. Try experimenting with the 'Nor' button in the texture types buttons (this turns on bumpmapping). The amount of bumpmapping can be controlled with the 'Nor' slider.
5. For the grass and the water I have re-used this texture. To create good looking grass, create a dull green material and apply this texture. Next, look at the buttons in the bottom-right of the Material Buttons screen. The value of 'Col' determines how much of the texture's color is mixed with the material's own color. Decrease this value to make the grass look greener while still retaining the texture's noisy character. I had to increase SizeX and SizeY to 15 to get a satisfactory result.
6. To use this texture with water, first create a blue-plastic material. Use a high specularity and hardness. Now apply the grass texture, but turn off the 'Col' button on the top right in the material buttons screen. Instead, select 'Nor'. This will turn the map into a bump-map, simulating bumps in the material.
7. Finish the water by setting 'Alpha' to 0.5 - this creates a transparent material. In the row of buttons in the middle of the screen, select 'ZTransp'. This option will force Blender to calculate objects underneath the water surface, too.
8. Here is the final result - quite a lot better than what we started off with, don't you think? Of course it is very important to build a good collection of textures for yourself. Take the time to clean them up, make them seamless and ready for use.
 |
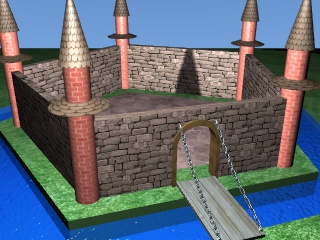 |
| Grass and water | A fully textured castle. |