Animation is very important for conveying the impression of life in a game world, and for giving the player an immediate reward for his or her decisions. Game characters typically have a set of animated actions they can perform, such as walking, running, crawling, making attacks or suffering damage. With the armature system, you can design each animation in a separate action and define which actions play at which times using LogicBricks.
Note that at the time of writing, animation constraints (including the IK Solver) do not work in the game engine. This means that game animation must be done using forward kinematics exclusively.
1. Multiple Actions and Fake Users
If you want to create multiple actions in a blender file, remember that only one action can be assigned to an armature at a time. If the other actions do not have any users, they will not be saved when the file is saved. To prevent additional actions from disappearing, you can add fake users .
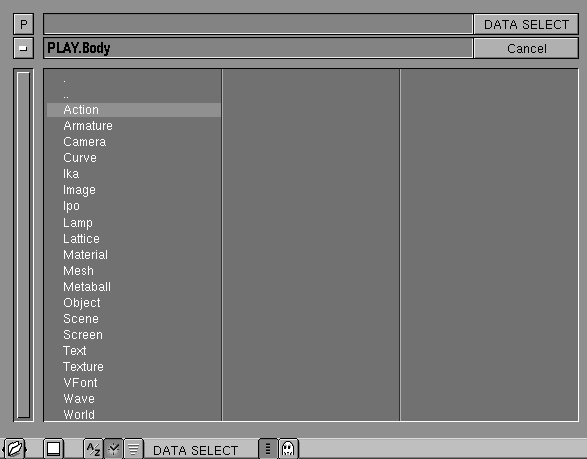
To create a fake user for an action, press SHIFT-F4. This lets you browse the various objects and data blocks in the blender file. You may need to click on the "P" button once or twice to find the root of the file's structure, which should look like Figure 22-11. From there, descend into the Action directory, and select the actions you want to protect with RMB. Pressing FKEY will add a fake user to the selected items (indicated by the capital "F" that appears next to the action name), preventing them from being accidentally removed from the file.
Figure 22-11. Structure of the file in the DataSelectWindow
2. Creating an Idle Cycle
The simplest action to create for a character is the "idle" or "rest" position. This action can be played when the character is not doing any other action. A good idle animation gives the game character the illusion of life by keeping it moving even when the player is not actively issuing any control commands.
Since the character is not moving through the level while playing the idle animation, we don't have to worry about synching the animation with the physics system.
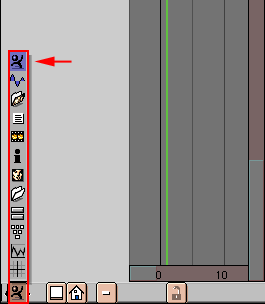
To create a new action, split the view by clicking with MMB on one of the window borders, selecting "Split Area", and LMB to set where the split will appear. Change the type of the newly created window to ActionWindow by LMB on the WindowType icon in the Header and choosing the topmost icon (Figure 22-12).
Figure 22-12. Switch to ActionWindow
Go to a 3DWindow and select the armature you wish to animate. Enter PoseMode and make sure that Blender is on frame 1 by changing the number in the frame counter button in the header of the ButtonsWindow, or by using LEFTARROW and DOWNARROW.
![]()
You are now ready to make the first frame of the idle animation, using the PoseMode techniques described earlier. What this pose looks like will depend largely on the personality of your character and the type of game you are making. Consider which actions might immediately follow the rest position. If the character is supposed to be able to fire a weapon quickly, the rest position might involve holding the weapon in a ready-to-fire stance. A less fast-paced game might have the character adopt a more relaxed "at-ease" pose.
When you are satisfied with the first frame, select all of the bones in PoseMode and insert a rotation key by pressing IKEY->"Rot". Next, deselect all bones and select only the character's root bone (usually the pelvis or hips) and insert a "Loc" key. Normally only the root bone gets location keys, while all bones get rotation keys.
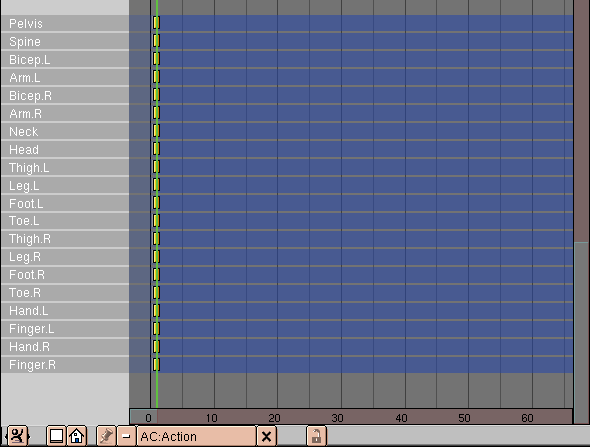
When you insert keys, you should notice that new channels appear in the action window (Figure 22-13). The yellow rectangles represent selected keyframes and grey rectangles represent unselected keyframes. You can move keyframes in the action window by selecting them and grabbing them with GKEY.
Figure 22-13. Keys in the ActionWindow
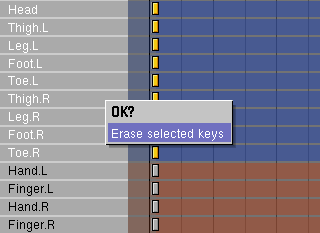
Keyframes can be deleted by selecting them and pressing XKEY->"Erase selected keys".
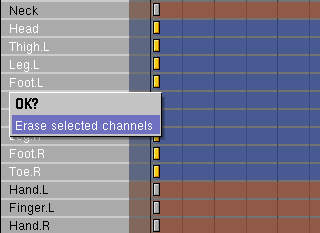
You can erase an entire action channel (all keyframes for a particular bone), by selecting one or more action channels by SHIFT-RMB on the channel names in the column at the left. Selected channels are displayed in blue, while unselected channels are displayed in red. Pressing XKEY->"Erase selected channels" with the mouse over the channel list deletes the selected channels.
In order to create an action that loops smoothly, you will need to copy the first frame and duplicate it as the last frame of the animation. There are two main ways of doing this.
![]()
Idle animations tend to be fairly long, since the motion involved is typically subtle and shouldn't be seen to loop too often. The last frame should be at least 100 or higher.
While animating, you can "scrub" through the animation by holding the left mouse button and dragging the mouse in the action window. This will move the position of the green "current frame" indicator. In this way you can test parts of the animation to make sure they play smoothly. You can also play the whole animation by moving to the first frame and pressing ALT-A with the mouse over a 3DWindow. To see the animation in a loop, set the "Sta" and "End" values in the Display Buttons (F10) window to match the start and end frames of your loop.
At this point you can go back in and add additional key frames between the start and end. Remember to keep the motion reasonably subtle so that the player doesn't notice the repetitive nature of the action. Good elements to add are breathing effects, having the character adjust its grip on any weapons or equipment, and slight head turns.
When you are satisfied with the action, give it a name by editing the name field in the ActionWindow Header. Also make sure to create a fake user for the action to prevent it from disappearing from the file when you create your next action.
![]()
3. Creating a Walk Cycle
Another very important action is the character's walk cycle. This animation will be used when the character is moving through the level. This animation is somewhat more complicated, since we have to consider how the animation will interact with the physics system.
When creating the walk cycle, it is generally best to animate it in such a way that the character seems to be walking on a treadmill. The forward motion will be provided by the game's physics system at run time.
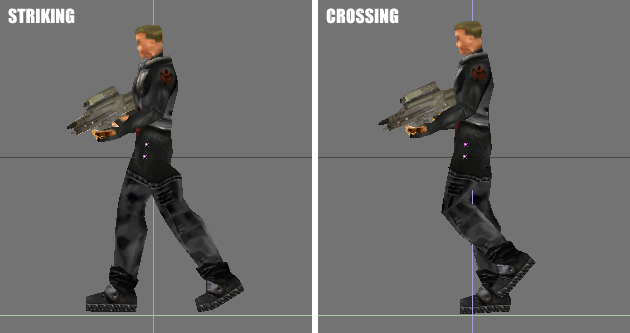
A walk-cycle actually consists of two steps. One for the left foot and one for the right foot. For each step there are two main key frames: the striking pose and the crossing pose (Figure 22-14). The striking pose represents the moment when one foot has just been planted on the ground and the other is about to be lifted. The crossing pose represents the moment when the two legs cross each other under the character's center of gravity: one foot is on the ground and moving backwards, while the other is lifted and is moving forwards.
Figure 22-14. Striking and crossing
To start creating this animation, switch to the action window and create a new blank action by clicking on the Action menu and choosing "Add New". This will create a copy of any action that may have already been on the character. Name the action and make sure the animation is blank, by moving the mouse over the channel list, selecting all channels with AKEY and deleting them with XKEY->"Erase selected channels".
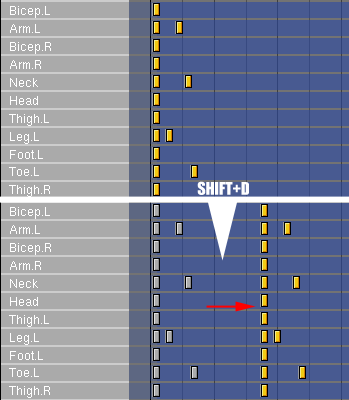
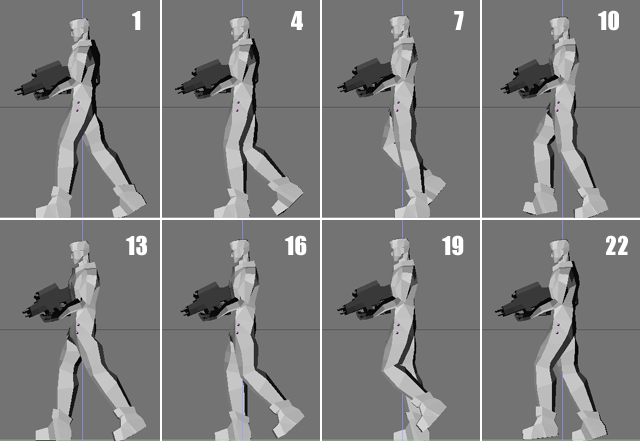
For this animation, we'll make a 24 frame walk cycle. We'll set five key frames to get a basic walking motion established. Once that's done you can go back and add additional key frames to smooth out the motion and improve the animation (Figure 22-15).
Figure 22-15. Keyframes for the walkcycle
The first thing to do is to set the striking pose for the left foot. This pose will be copied and pasted as the last frame of the action to ensure the animation loops smoothly. Note that if you later make changes to this first frame, you should copy those changes to the last frame again.
The striking pose has the following characteristics:
When you are satisfied with the pose, insert rotation keyframes for all bones, and insert an additional location keyframe for the pelvis bone. Copy this pose to the end of the animation loop, which will be frame 25. Frame 25 will not actually be played however; we will end the loop at frame 24 when playing. Since frame 25 is a duplicate of frame 1, the animation should play back seamlessly.
If you built the character's armature using the naming conventions and coordinate systems recommended earlier in the tutorial, you can take advantage of the character's axial symmetry by copying the striking pose and pasting it flipped. To do this, go to the first frame, and select all bones in PoseMode. Click the "Copy Pose" button and set the active frame to the middle of the animation (in this case, frame 13). To paste the pose, click the "Paste Flipped" button.
![]()
Set "Avail" keyframes for the appropriate bones. Note that if your animation does not incorporate arm swinging (for example if the character is carrying a weapon), you might choose to only select the pelvis and legs when copying and pasting the pose. Otherwise, the character will seem to switch the weapon from one hand to the other.
The next task is to create the crossing pose. The first one will occur halfway between the first frame of the animation and the flipped pose you just created (i.e. frame 7). The crossing pose has the following characteristics:
Set "Avail" keyframes for all bones on this frame and copy the pose. Advance the active frame to halfway between the end of the animation and the second striking pose (frame 19) and paste the pose flipped.
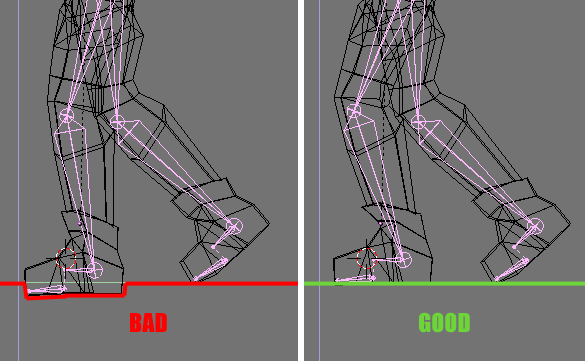
At this point test your animation loop. It is a good idea to go in and look at it frame by frame with LEFTARROW and RIGHTARROW. If you see frames where the feet seem to push through the floor, adjust the height of the pelvis accordingly and set "Loc" keyframes, or adjust the rotation of the bones in the offending leg and set "Rot" keyframes for them (Figure 22-16).
Figure 22-16. Bad positions of the character's legs
If you prefer working with IpoWindows, you can edit action channel Ipos directly, though this is not always required. To do this, select an action channel in the ActionWindow, make a window into an IpoWindow with SHIFT-F6 and click on the ActionIpo icon in the IpoWindow Header.
![]()
![]()
When you are done, make sure to add a fake user for this action to prevent it from getting lost when the file is saved.