1. Naming Bones
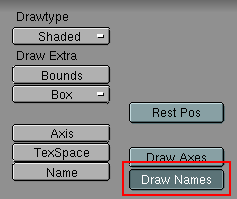
It is a good idea to give meaningful names to the bones in your armature. This not only makes it easier to navigate the hierarchy, but if you follow a few simple naming rules, you can take advantage of the pose-flipping features. You can have the bone names displayed on the model by selecting the armature, switching to the EditButtons window (F9) and clicking the green "Draw Names" button.
For symmetrical body elements such as arms or legs, it is a good idea to append ".left" or ".right" (or simply ".l" and ".r") suffixes to each part. This information is used when flipping poses. An example of this would be to name the right arm "Arm.Right" and the left one "Arm.Left". Non-paired limbs such as the head or chest do not need any special naming.
When re-using the same action on different armatures, the engine looks at the names of the bones in the armature, and the names of the animation channels in the action. When there is a perfect match (capitalization matters), the animation data in the action will be applied to the appropriate bone. If you want to take advantage of action re-use, make sure that all your skeletons use the same naming convention.
2. Parenting Bones
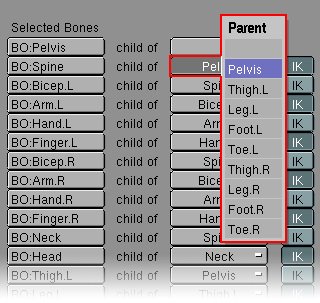
To establish parenting relationships within an armature, you must first make sure the armature is in EditMode. Select only the bones you wish to modify or if you prefer, select all bones with AKEY) and switch to the EditButtons with F9. You will see a list (Figure 22-3) of the selected bones and next to each bone in the list you will see a "child of" label and a pull-down menu. To make a bone the child of another bone, simply select the appropriate parent from the pull-down menu. Note that the menu only contains the names of bones that could be valid parents. This prevents you from accidentally making a loop in parents (such as making an arm the parent of the chest, which should be parent of the arm).
Figure 22-3. Parenting bones in the EditButtons
To clear a parenting relationship, set the "child of" menu to the first (empty) choice in the menu.
Parenting is much easier if you have already named your bones, though it is not necessary.
Pressing the "IK" button (IK means here "inverse kinematics") next to the parenting menu will ensure that the root of the child is connected to the tip of the parent. This is not so important for game models since the IK solver is not active in the game engine, but it can be a useful way to define a bone "chain" which can be selected with LKEY.
3. Basic Layout
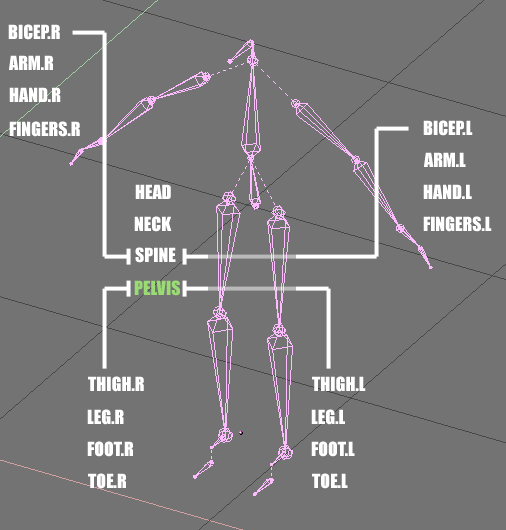
For a typical humanoid character, the following hierarchy is recommended (Figure 22-4). Some characters may benefit from additional bones for elements such as flowing skirts or hair.
Figure 22-4. Typical bone layout for a humanoid character
4. Coordinate System Conventions
Before going on, it is a good idea to clear any rotation or scaling that may have been assigned to the armature. Leave EditMode and with the armature object selected, apply the transformations with CTRL-A.
The center point of the armature (represented by a small yellow or purple dot) should be located on the ground, between the character's feet. If this is not the case, enter EditMode for the armature, select all bones with AKEY and move the bones so that the center point is at the correct location.
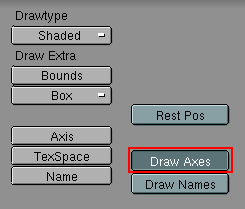
The final step before preparing the mesh for deformation is to ensure that the bones in the armature have consistent orientations. Each bone is like an individual object with its own coordinate system. You can see these coordinate systems by selecting the armature object, switching to the EditButtons with F9 and clicking on the green "Draw Axes" button.
Generally you want to make sure that the Z-axis for each bone points in a consistent direction. In most cases this means having the Z-axis point upwards. You can adjust the roll angle of a bone by selecting it in EditMode, pressing NKEY and adjusting the "roll" field.
If you are going to be re-using actions on different armatures, it is very important that both armatures have their bones oriented in the same way. If this is not the case, you will notice a lot of strange flipping happening when you assign the action.