Bouncing Ball With Tweening
(adapted from Flash 5 by Bill Sanders and used with his
permission)
Objectives:
- to examine the process of tweening
- to establish the relationship between keyframes and tweening
Basics:
- modification of objects can only occur on keyframes
- need to reduce the number of keyframes required for a movie
- identification of the location of the necessary keyframes
- objects change over time
- a ball will elongate as it falls, flatten slightly when it strikes the ground
and elongate as it ascends
Exercise:
|

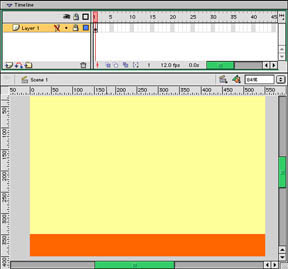
Figure One - The Background
|
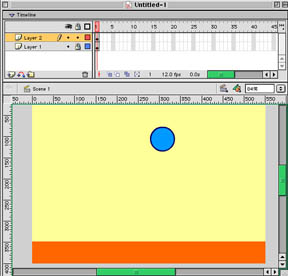
Figure Two - The Bouncing Ball
|
Creation of the Background Layer (See Figure
One)
- Select the Window Menu and make the
Info Panel active by clicking on it (if
not already visible).
- Click on the Fill Color Well and choose
a light color from the color palette. Repeat this procedure for
Stroke Color Well.
- Select the Rectangle Tool from the
Toolbox and draw a rectangle that covers the entire stage.
- Click on the Fill Color Well and choose
ta brown color green from the color palette. Repeat this procedure for Stroke
Color Well.
- Select the View Menu and click on Rulers
(measured in pixels). When Rulers are used a marker appears on the Vertical
Ruler as the mouse is dragged downward.
- Select the Rectangle Tool from the Toolbox
and draw a rectangle with a height of approximatley 50 pixels having a width
of the stage covering the bottom portion of the stage.
- Click on the layer's lock column and lock this layer so that it will not
be selected when working on the animation.
The Ball Layer (See Figure Two)
a) Creation and Positioning of the Instance
- This layer will contain the bouncing ball and all the required keyframes.
- Create a new layer by selecting the Insert Menu
and selecting Layer
- The Properties Panel is required so
select the Windows Menu and choose the
Properties Panel.
- Select the Oval Tool and in the Properties
Panel drag the slider to create a stroke of 3.
- Click on the Fill Color Well and choose
a light blue color from the color palette.
- Click on the Stroke Color Well and choose
a dark blue color from the color palette.
- Hold down the shift key and draw a small circle on the stage
- Select the Arrow key (black) from the
Tool Box and draw a rectangle around the
ball including the outside edge
- Go to the Info Panel and enter the following
values W= 56, H = 56
- Select the Insert Menu and then select
the Convert to Symbol (shortcut is pressing
the F8 key). When the Symbol Properties Dialog Box
opens click on the button beside Graphic
in the behaviors column. Use the name Ball for the symbol name and click OK.
An instance of the symbol Ball has been created.
- To move back to the main stage click on the Scene
Icon in the upper left hand corner just above the stage.
- Select the ball by clicking on it and in the Info
Panel type in the following values X = 280, Y = 78
- Once the instance has been created and positioned the animation process
is next.
b) The Animation Process

Figure Three - The Timeline with 65 frames selected
- The process includes adding 65 keyframes (See Figure Three)
- Make sure the Properities Panel has
been selected.
- Move the horizontal slider in the timeline window a bit to the right until
frame 65 is visible at the top of the timeline.
- Holding down the Shift Key click on the frame just below 65 for both layers
one and two. These two frames will turn a light shade of gray.
- Select the Insert Menu and choose Frame.
(shortcut is pressing F5)
- Drag the playhead back to the beginning.
- Select the Edit Menu and click on Snap
of Pixels
- Click on the 26th frame, then select Keyframe
from the Insert Menu and then select the
ball. The 26th frame will be high lighted. (The shortcut for inserting a Keyframe
is to use F6).
- Move the instance of the ball by using the Info
Panel and changing the coordinates to X = 280 and Y = 228.
- Click on the stage, then click on the ball and then double click on the
first frame.
- In the Properties Panel select Motion in the Tween pop-up menu and make
sure the Scale checkbox is selected and None is selected for Rotation. (See
Figure Four)

Figure Four - The Properties Panel
- Time to change the shape of the ball
- Click on the 36th frame, then select Keyframe
from the Insert Menu and then select the
ball. The 36th frame will be high lighted. (The shortcut for inserting a Keyframe
is to use F6).
- The shape of the instance of the ball is changed by using the Info
Panel and changing W = 46 and H = 78.
- Click on the stage, then click on the ball and move the ball down until
it touches the surface of the floor.
- Double click on the 26th frame.
- In the Properties Panel select Motion
in the Tween pop-up menu and make sure
the Scale checkbox is selected and None
is selected for Rotation. (See Figure
Four)
- Click on the 42nd frame, then select Keyframe
from the Insert Menu and then select the
ball. The 42nd frame will be high lighted. (The shortcut for inserting a Keyframe
is to use F6).
- The shape of the instance of the ball is changed by using the Info
Panel and changing W = 76 and H = 36.
- Click on the stage, then click on the ball and move the ball so that it
touches the surface of the floor. Use the Up or Down arrow keys.
- Keep the center line on the ball drop by using the left and Right arrow
keys.
- Double click on the 36th frame.
- In the Properties Panel select Motion
in the Tween pop-up menu and make sure
the Scale checkbox is selected and None
is selected for Rotation. (See Figure
Four)
- Click on the 45th frame, then select Keyframe
from the Insert Menu and then select the
ball. The 45th frame will be high lighted. (The shortcut for inserting a Keyframe
is to use F6).
- The shape of the instance of the ball is changed by using the Info
Panel and changing W = 56 and H = 56.
- Click on the stage, then click on the ball and move the ball so that it
touches the surface of the floor. Use the Up or Down arrow keys.
- Double click on the 42th frame.
- In the Properties Panel select Motion
in the Tween pop-up menu and make sure
the Scale checkbox is selected and None
is selected for Rotation. (See Figure
Four)
- Click on the 49th frame, then select Keyframe
from the Insert Menu and then select the
ball. The 49th frame will be high lighted. (The shortcut for inserting a Keyframe
is to use F6).
- The shape of the instance of the ball is changed by using the Info
Panel and changing W = 56 and H = 78.
- Click on the stage, then click on the ball and position the ball using the
Info Panel so that X = 280 and Y=292.
- Double click on the 45th frame.
- In the Properties Panel select Motion
in the Tween pop-up menu and make sure
the Scale checkbox is selected and None
is selected for Rotation. (See Figure
Four)
- Click on the 54th frame, then select Keyframe
from the Insert Menu and then select the
ball. The 54th frame will be high lighted. (The shortcut for inserting a Keyframe
is to use F6).
- The shape of the instance of the ball is changed by using the Info
Panel and changing W = 56 and H = 66.
- Click on the stage, then click on the ball and position the ball using the
Info Panel so that X = 280 and Y=230.
- Double click on the 49th frame.
- In the Properties Panel select Motion
in the Tween pop-up menu and make sure
the Scale checkbox is selected and None
is selected for Rotation. (See Figure
Four)
- Click on the 65th frame, then select Keyframe
from the Insert Menu and then select the
ball. The 65th frame will be high lighted. (The shortcut for inserting a Keyframe
is to use F6).
- The shape of the instance of the ball is changed by using the Info
Panel and changing W = 56 and H = 56.
- Click on the stage, then click on the ball and position the ball using the
Info Panel so that X = 280 and Y=78.
- Double click on the 54th frame.
- In the Properties Panel select Motion
in the Tween pop-up menu and make sure
the Scale checkbox is selected and None
is selected for Rotation. (See Figure
Four)
- The ball's bounce is complete and th etimeline should appear as in Figure
Five

Figure Five - Timeline With Necessary Tweens.
- The progress of the ball can be charted by moving the playhead to the beginning
and then moving it to the right, by choosing Play
from the Control Menu or by choosing the
Control Menu and selecting select Debug
Movie. Once
the movie has been debugged select
Test Movie.
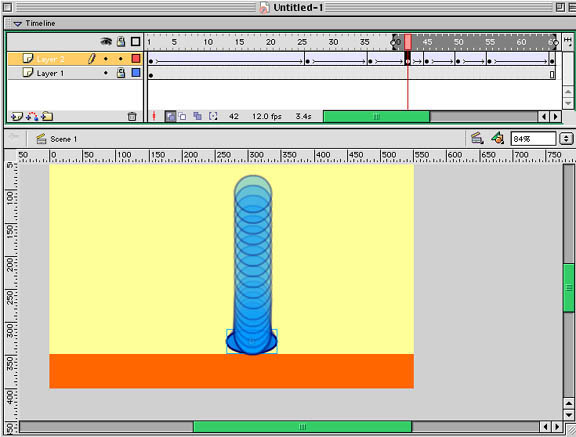
- Remember Onion skins
are used to provide a sequential object-position
view of the movement. This process permits the viewing of where each change
occurs.
- To use the onion skin:
- move the play head to the last frame
- select the moving object to wish to show
- click on the Onion Skin
- select the Modify Onion Markers
drop down menu (fourth Onion Skin Icon) and choose Onion
All
- See Figure Six for an example of what the
Onion Skin would look like.

Figure Six - Onion Skin Applied.
