Layers and Independent Motion
of a Compound Object
(adapted from Flash 5 by Bill Sanders and used with his
permission)
Objectives:
- to use a motion tween to animate a compound object
- to control the motion of a compound object
- to use multiple layers
- to introduce the Transform Panel and Scale and Rotate found in the Modify
Menu
Basics:
- a compound object is a collection of objects that must be coordinated.
- the process of walking requires a total of five keyframes.
- additional tweening is required when the required motion created in Flash
is not adequate. The process used is a basic principle of animation. If the
beginning and ending positions are defined and additional tweens must be inserted
we use the following process. Identify the first position as frame one and
the final position as keyframe seventeen. If three additional tweens are required
keyframes must be included at frame nine (the breakdown frame), frame five
and frame thirteen. These locations are determined using the mathematical
processes of (1 + 17)/2 = 9, (1 + 9)/2 = 5 and (9 + 17)/2 = 13.
- to fine tune a motion additional keyframes can be added and it is not necessary
to add them to all layers
- the center point formed when using the Free Transform Tool can be moved
to a position that helps align objects
- an object can be rotated using the Scale and Rotate Panel found in the Transform
Panel in the Modify menu. The degree of rotation is maintained until it is
changed allowing for a number of objects to be rotated the same amount.
- Rulers found in the View Menu can be used to help align an object or objects
- when guidelines are used they will not appear in the movie
- components that exist on different levels can be selected by holding down
the Shift Key and selecting each one
- when selected components are rotated they become disconnected
- the arrow keys are used to move the objects into their correct position
- using the Shift key and the arrow key will move the object 8 pixels.
- use the Paint Bucket item to fill a figure
Exercise:
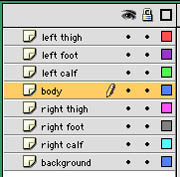
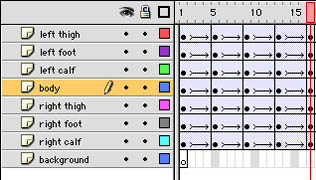
a) Layers
- a total of eight layers need to be created, labeled
as indicated and arranged in the order as outlined in the diagram below
- the background layer will be white in color and be
static (none changing)
- lock the background layer
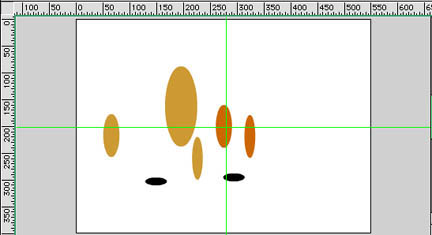
b) The Body Layer
- all drawings will be done on this layer and all drawings should be made
separate from each other
- set the Stroke Color Well to no color
- open the Info Panel
- select the Ruler command from the View menu. Two rulers will appear, one
at the top of the stage and the second to the left of the stage (see the diagram
above)
- select the top ruler by clicking on it with the mouse and without releasing
the mouse drag a guideline to the vertical center of the stage. When vertical
guideline is positioned release the mouse.
- select the side ruler by clicking on it with the mouse and without releasing
the mouse drag a guideline to the horizontal center of the stage. When horizontal
guideline is positioned release the mouse.
- select the Ruler command again to remove the rulers from the stage. The
two guidelines will remain.
- click on the Oval tool and then select the Fill Color Well and type in the
code #CC9933 in the box at the top of the color palette and press return.
This color will be used for the body and the left thigh and calf.
- use the Oval tool to draw an ellipse of the stage to represent the body.
- select the body using the Black arrow and change the dimensions to W = 60
and H = 130
- use the Oval Tool to draw the left thigh and set its dimensions to W = 30
and H = 80
- use the Oval Tool to draw the left calf and set its dimensions to W = 20
and H = 80
- select the left thigh and use Command C to make a copy and then use Command
V to paste the copy
- change the color to #CC6600 in the Fill Color Well and using the Paint Bucket
change the color of the right thigh
- select the left calf and use Command C to make a copy and then use Command
V to paste the copy
- use the Paint Bucket change the color of the right calf
- change the color in the Fill Color Well to black and using the Oval Tool
draw an ellipse with dimensions W = 40 and H = 15.
- select the drawn ellipse and paste a copy of this object using Command C
and Command V.
- select each object and Convert to Symbol as a graphic with the appropriate
label
- select each object except the body and delete them. The names
of these objects will appear in the Library found in the Windows Menu.
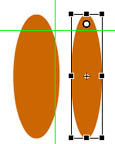
c) The Components of the Legs
- drag the instance of each component of the leg to its appropriate
layer
- the centers of each of these instances must be changed so that each
center will act as a pivot point for each component
- to move the center point
- increase the magnification of the stage to between 200 and 400
percent by using the pop-up menu located near the upper right hand
corner of the stage
- select each instance in turn and then select the Free Transform
Tool from the Tool Box
- click on the the center point and without releasing the mouse
drag the center to the locations as indicated below
- for the thigh and calf the pivot point should be moved to
the top of the object where the leg joints would go
- the foot pivot point should be moved to the point where where
the ankle joins the lower leg
- using the pop-up menu select Show frame
|
 |
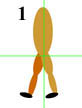
d) Positioning of the Components
- place the body instance in the middle of the vertical guide with the
bottom of the body just touching the horizontal guide
- the initial position of each leg is shown in figure 1 in the diagrams
below and the information provided in the table below can be used as
a guide to help position each leg. Remember that these are a guide and
you may have to adjust the rotation to get the desired result.
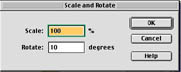
- to get the right component angles use the Scale and Rotate Command
found in the Transform Panel in the Modify menu.
|
 |
Positioning of the legs (Component Angles)
| Keyframe |
Right Thigh
|
Left Thigh
|
Right calf
|
Left Calf
|
Right Foot
|
Left Foot
|
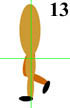
| 1 |
20
|
-20
|
20
|
-20
|
20
|
-20
|
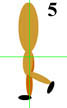
| 5 |
0
|
15
|
0
|
-80
|
0
|
-80
|
| 9 |
-20
|
20
|
-20
|
20
|
-20
|
20
|
| 13 |
15
|
0
|
-80
|
0
|
-80
|
0
|
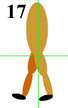
| 17 |
20
|
-20
|
20
|
-20
|
20
|
-20
|
- objects can be positioned independently or as a group
- if done independently use the Scale and Rotate command, input the indicated
value, and then move the object into its correct position using the arrow
keys
- if done as a group
- drag the components of the left leg together
- click on the Black arrow in the Tool Box and while holding down the
Shift Key select the components of the left leg
- rotate the components using the Scale and Rotate Command by inputting
the value -20 and then clicking on OK
- use the arrow keys to move the objects into the correct position. Remember
to use the pivot points.
- drag the components of the right leg together
- click on the Black arrow in the Tool Box and while holding down
the Shift Key select the components of the right leg
- rotate the components using the Scale and Rotate Command by inputting
the value 20 and then clicking on OK
- use the arrow keys to move the objects into the correct position.
Remember to use the pivot points.
- insert keyframes in all but the background layer in frames 5, 9, 13
and 17.
- hold down the shift key and select frame 1 in all of the layers except
the background layer
- insert a motion tween
- repeat the same process for frames 5, 9 and 13 remembering to exclude
the background layer and the result should look like the diagram at
the right.
|
 |
- in frames 5 and 13 move the body the body up from the horizontal line by
selecting the body and while holding down the Shift Key press the up arrow
once.
- using the table above as a guide position the components at each keyframe
- test your movie
- if certain components appear to separate move the playhead to that position
and insert a keyframe for that component and reposition the disjointed component.
- play your movie
Walking Movie