The Bouncing Ball
(adapted from Flash 5 by Bill Sanders and used with his
permission)
Objectives
- frame-by-frame (inbetweening) exercise using the elements of Flash
- microscopic examination of the process of animation
Basic Ideas
- objects change over time
- as a ball descends it elongates just prior to striking the ground
- upon striking the ground the ball flattens slightly
- the ball elongates as it ascends
Exercise
|

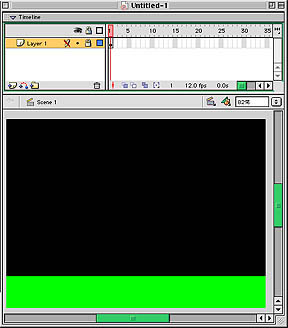
Figure One - The Background
|

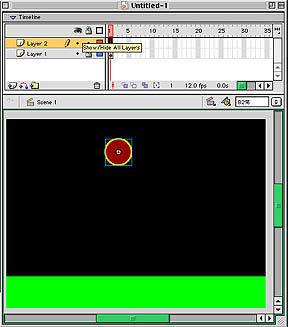
Figure Two - The Ball
|
Creation of the Background Layer (See Figure
One)
- Select the Window Menu and make the
Info Panel active by clicking on it (if
not already visible). See Figure Three
- Click on the Fill Color Well and choose
the color black from the color palette. Repeat this procedure for
Stroke Color Well.
- Select the Rectangle Tool from the
Toolbox and draw a rectangle that covers the entire stage.
- Click on the Fill Color Well and choose
the color green from the color palette. Repeat this procedure for Stroke
Color Well.
- Select the Rectangle Tool from the Toolbox
and draw a rectangle with the top of the rectangle at Y-coordinate 334 having
a width of the stage and having a height that covers the bottom portion of
the stage.
- Click on the layer's lock column and lock this layer so that it will not
be selected when working on the animation.
|
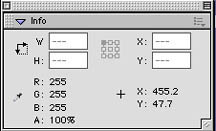
Figure Three - Info Panel
|

Figure Four - Properties Panel
|
The Ball Layer (See Figure Two)
a) Creation and Positioning of the Instance
- This layer will contain the bouncing ball and all the required keyframes.
- Create a new layer by selecting the Insert Menu
and selecting Layer
- The Properties Panel is required so
select the Windows Menu and choose the
Properties Panel. See Figure Four
- Select the Oval Tool and in the Properties
Panel drag the slider to create a stroke of 3.
- Click on the Fill Color Well and choose
the color red from the color palette.
- Click on the Stroke Color Well and choose
the color yellow from the color palette.
- Hold down the shift key and draw a small circle on the stage
- Select the Arrow key (black) from the
Tool Box and draw a rectangle around the
ball including the outside edge
- Go to the Info Panel and enter the following
values W= 56, H = 56
- Select the Insert Menu and then select
the Convert to Symbol (shortcut is pressing
the F8 key). When the Symbol Properties Dialog Box
opens click on the button beside Graphic
in the behaviors column. Use the name Ball for the symbol name and click OK.
An instance of the symbol Ball has been created.
- To move back to the main stage click on the Scene
Icon in the upper left hand corner just above the stage.
- Select the ball by clicking on it and in the Info
Panel type in the following values X = 280, Y = 79
- Once the instance has been created and positioned the animation process
is next.
b) The Animation Process
Figure Five - Timeline up to 65 frames
- The process includes adding 65 keyframes and moving the ball down in increments
of 8 pixels using the down arrow key.
- Move the horizontal slider in the timeline window a bit to the right until
frame 65 is visible at the top of the timeline.
- Holding down the Shift Key click on the frame just below 65 for both layers
one and two. These two frames will turn a light shade of gray.
- Select the Insert Menu and choose Frame.
(shortcut is pressing F5)
- Drag the playhead back to the beginning.
- Select the Edit Menu and click on Snap
of Pixels
- Click on the second frame, then select Keyframe
from the Insert Menu and then select the
ball. The second frame will be high lighted. (The shortcut for inserting a
Keyframe is to use F6).
- Use the down arrow key to move the ball down 8 pixels. The Y value should
change from 79 to 87.
- Select the third frame, then select Keyframe
from the Insert Menu, select the ball
and move the ball down 8 pixels.
- Repeat this procedure up to frame 23.
- Note:
- the ball starts to elongate at frame 25
- the ball starts to flatten out at frame 34
- at frame 37 the ball begins to expand and starts to elongate vertically.
This time you will be using the up arrow key to indicate the pixel increments.
- you will need to use your judgment to decide how much the ball moves
as it nears the table, when in contact with the table and as it leaves
the table.
- the progress of the ball can be charted by moving the playhead to the
beginning and then moving it to the right, by choosing Play
from the Control Menu or by choosing
the Control Menu and selecting Debug
Movie. Once the movie has been debugged
select Test Movie.

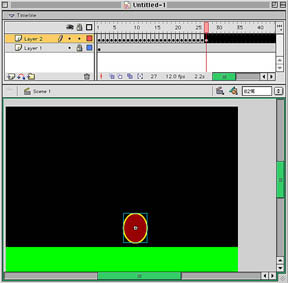
Figure Six - ball elongating as it moves away from the table
- Staring at frame 24 the above procedure will be repeated but this time in
the number of pixels the ball moves is based on your observations and in addition,
the H and W values will need to be changed based on the values provided in
the following chart.
|
Frame Number
|
H Value
|
W Value
|
Frame Number
|
H Value
|
W Value
|
|
25
|
66
|
56
|
35
|
56
|
70
|
|
26
|
70
|
56
|
36
|
46
|
78
|
|
27
|
70
|
56
|
37
|
56
|
70
|
|
28
|
70
|
56
|
38
|
56
|
56
|
|
29
|
70
|
56
|
39
|
66
|
56
|
|
30
|
70
|
56
|
40-49
|
70
|
56
|
|
31
|
70
|
56
|
50
|
66
|
56
|
|
32
|
78
|
56
|
51
|
60
|
56
|
|
33
|
56
|
56
|
52-65
|
56
|
56
|
|
34
|
56
|
66
|
|
|
|
- Onion Skins are used to provide a sequential
object-position view of the movement. This process permits the viewing of
where each change occurs.

- To use the onion skin:
- move the play head to the last frame
- select the moving object to wish to show
- click on the Onion Skin
- select the Modify Onion Markers
drop down menu (fourth Onion Skin Icon) and choose Onion
All
- From the Control Menu select Debug
Movie. Once
the movie has been debugged select
Test Movie.
